Wintry days call for not-too-sweet brownies with a tangy an creamy coffee kick. These Extra Dark Brownies are naturally free of gluten thanks to hazelnut flour, which adds a subtle suggestion of earthiness. (But if you don’t have hazelnut flour on hand, you can substitute the same amount of all-purpose or whole wheat flour and get equally delicious results.) The generous coif of Coffee Mascarpone Frosting spread atop the brownies is slightly tangy and light as a cloud, and the dusting of cocoa powder ups the elegance factor.
Print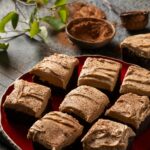
Extra Dark Brownies with Coffee Mascarpone Frosting
- Yield: Makes 9–12 brownies 1x
Description
Finished with a dusting of cocoa powder, these are an elegant winter treat that’s indulgent yet not overly sweet.
Ingredients
For the brownies:
- 1/2 cup (1 stick, or 113g) butter, cut into chunks
- 1 cup (200g) granulated sugar
- 3/4 cup (129g) bittersweet or semi-sweet chocolate chips
- 2 eggs
- 1 tsp instant coffee granules
- 1/2 cup (57g) hazelnut flour
- 1/2 cup (42g) cocoa powder
- 1/4 tsp baking soda
- 3/4 tsp salt
For the frosting:
- 1 cup (226g) heavy whipping cream, cold
- 1 tbsp instant coffee granules
- 8 oz (226g) mascarpone cheese, cold
- 1 cup (113g) powdered sugar
- 1/2 tsp vanilla extract
- Generous pinch of salt
- Cocoa powder, for dusting
Instructions
- Preheat the oven to 325 degrees. Spray an 8×8 square baking dish with baking spray and line it with parchment paper.
- Begin the frosting by combining the heavy whipping cream and tablespoon of instant coffee granules in a bowl and mixing until combined. Store this bowl in the fridge while you prepare the brownies so the granules can continue to dissolve into the cream.
- Prepare the brownies. In a medium saucepan, combine the butter and sugar. Cook over medium heat, stirring occasionally, until the butter has fully melted and a few bubbles have appeared. Remove the pan from the heat and stir in the chocolate chips until they melt. Transfer the mixture to a mixing bowl and let it cool for a few minutes before you add the eggs and teaspoon of instant coffee granules. Then, add the eggs and coffee granules and whisk until fully incorporated and the mixture is smooth and glossy, about 30 seconds.
- In another bowl, whisk together the hazelnut flour, cocoa powder, baking soda, and salt. Add these to the wet ingredients and fold the batter together with a spatula until combined.
- Transfer the batter to the prepared baking pan and smooth it across the top and into the corners using a spatula or offset spatula. Bake for 33-40 minutes, or until the brownies have puffed up all over and a toothpick inserted into the center of the brownies has come out with just a few moist crumbs on it. Allow to cool to room temperature.
For the frosting:
- In the bowl of a stand mixer fitted with the whisk attachment, combine the mascarpone cheese, powdered sugar, vanilla, and salt on low speed just until combined.
- Get the coffee-cream mixture from the fridge and give it another thorough stir; then drizzle it into the stand mixer bowl while the mixer is running on low speed. Increase the speed to medium, and whip until the mixture holds stiff peaks (about 30 seconds to a minute).
- Spread the frosting evenly across the cooled brownies using a spatula or offset spatula. Then, using a sieve, shake a light dusting of cocoa powder atop the brownies.
- Slice and serve. For extra-neat edges, chill the brownies for at least three hours in the fridge before slicing them. The brownies will keep in the fridge, wrapped tightly, for up to five days.
Notes
If you’re making the brownies in advance, it’s good to save both the cocoa-powder dusting and the slicing for the last minute, and chill the brownies thoroughly before slicing, for neat edges.
Recipe by Caroline Saunders
Styling by Keith Recker
Photography by Dave Bryce
Subscribe to TABLE Magazine’s print edition.
