Home Blog Page 108

Martha Stewart-Inspired Chicken Pot Pie

0
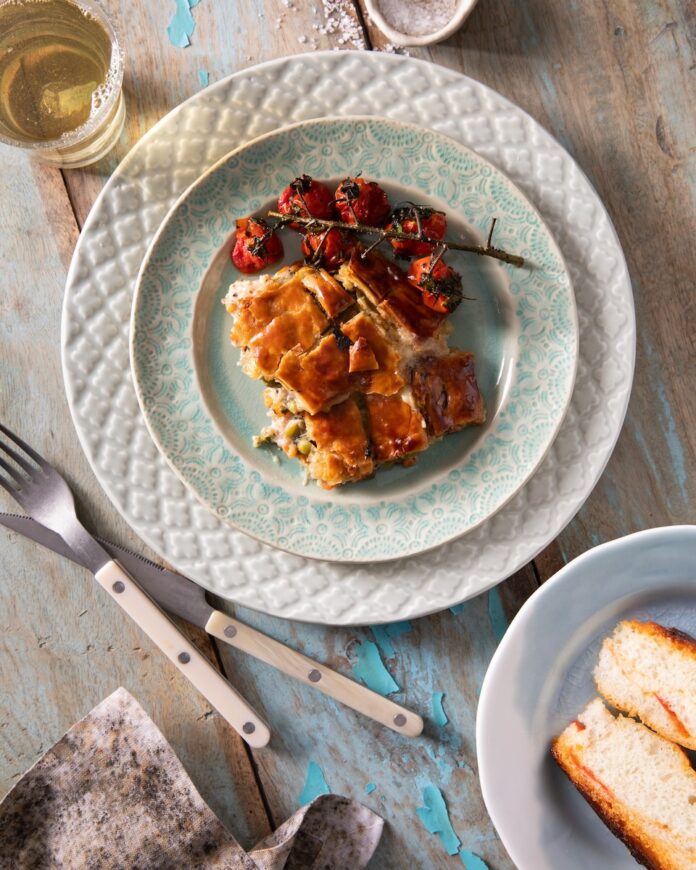
A portion of Martha Stewart-Inspired Chicken Pot Pie sits on a pale green and white plate with a fork and knife beneath it and a piece of focaccia in the bottom right corner.

There’s something about Chicken Pot Pie that just feels like home. When it’s fresh out of the oven, the chicken and veggie filling oozes out of the golden brown pie crust. There’s nothing quite like it. For this recipe, we take inspiration from Martha Stewart’s Classic Chicken Potpie where she refuses to use frozen puff pastry and instead makes a pastry from scratch. We do the same with our ultra buttery, crispy crust that you can also use in other recipes like our Martha Stewart-Inspired Apple Crostata.

Can I Mix the Chicken Pot Pie Dough by Hand?

While we do recommend using a mixer to make the process easier, you can still mix this dough by hand with a few adjustments. For mixing by hand you want to start with whisking together your dry ingredients in a large bowl. Cut the cold butter into small chunks and use either your fingers or a pastry blender to press the butter into the dry ingredients until small butter balls form. In order to properly mix in the water and vinegar, you’re going to want to add the mixture of the two just one tablespoon at a time to the bowl. It may help to mix this step with a wooden spoon. You want the dough to be just combined and not over-mixed. From here you can finish off our Martha Stewart-Inspired Chicken Pot Pie using the recipe below.

Print

clock clock iconcutlery cutlery iconflag flag iconfolder folder iconinstagram instagram iconpinterest pinterest iconfacebook facebook iconprint print iconsquares squares iconheart heart iconheart solid heart solid icon
A portion of Martha Stewart-Inspired Chicken Pot Pie sits on a pale green and white plate with a fork and knife beneath it and a piece of focaccia in the bottom right corner.

Martha Stewart-Inspired Chicken Pot Pie


  • Author: Selina Progar

Description

A crusty pie dough full of warm chicken and vegetables.


Ingredients

Scale

For the pie dough:

  • 8 oz all-purpose flour #1
  • 1 tbsp salt
  • 1 tbsp sugar
  • 2 sticks (8 oz) butter, cold cut into small chunks
  • 5.5 oz ice water
  • 1 tbsp vinegar
  • All-purpose flour for dusting

For the filling:

  • 3 tbsp vegetable oil
  • 2 cups yellow onion, extra large or two medium
  • 2 cups carrots
  • 1 tbsp garlic, minced
  • 1 small bag frozen peas
  • 32 oz chicken broth
  • 3/4 cup all-purpose flour, leveled but not packed
  • 1 whole rotisserie chicken, shredded and chopped
  • 1 bunch fresh parsley
  • 5 tbsp butter
  • Salt and pepper to taste

For the egg wash:

  • 1 whole egg
  • 1 egg yolk


Instructions

For the pie dough:

  1. Cut butter into small pieces and place back in the fridge.
  2. Make ice water, strain, rescale.
  3. Add to the mixer with the paddle attachment; flour, sugar, salt, butter and mix until the butter is pea sized.
  4. Add ice water and vinegar, add to the mixer. Mix just until a solid piece of dough forms.
  5. Place a dusting of all purpose flour on your table and roll out the dough to about an inch thick and put on parchment on a sheet tray and wrap. Let rest for 30 minutes.
  6. Remove from fridge and roll out the dough until its about ¼ inch (2 stacked quarters) thick.
  7. Let rest in the fridge while you make your chicken pot pie filling.

For the filling:

  1. Dice all vegetables to about the size of the peas.
  2. In a skillet or pot heat oil, add onions and carrots and cook until the onions begin to become transparent.
  3. Season as you go with salt and pepper so that the ingredients absorb the flavor.
  4. Add peas, then garlic. Cook only until the garlic becomes fragrant, 30 seconds to 1 minute.
  5. Add the butter and melt.
  6. Add the flour and stir until the vegetables are fully covered.
  7. Add the chicken broth. Simmer, stirring frequently so it does not burn. Cook for 8-10 minutes.
  8. Add chopped parsley and shredded chicken.
  9. Pour into casserole dish and top with pie dough. Recipe is above, but Pillsbury pie dough works perfectly. Brush with egg wash, slit the top with a plus sign in the center and bake until crust is golden brown.
  10. Let cool for 15 minutes before serving.

Cook Up the Rest of Selina’s Martha Stewart-Inspired Recipes

Angel Food Cake

One Pan Pasta

Keto Chicken Roll Ups

Five Spice Pumpkin Pie

Focaccia Sandwiches

Apple Crostata with Cheddar Cheese Crust

Focaccia

Hot Cherry Tomato Salad

Recipe by Selina Progar
Photography by Dave Bryce

Subscribe to TABLE Magazine’s print edition.
Martha Stewart-Inspired Focaccia Sandwiches

0
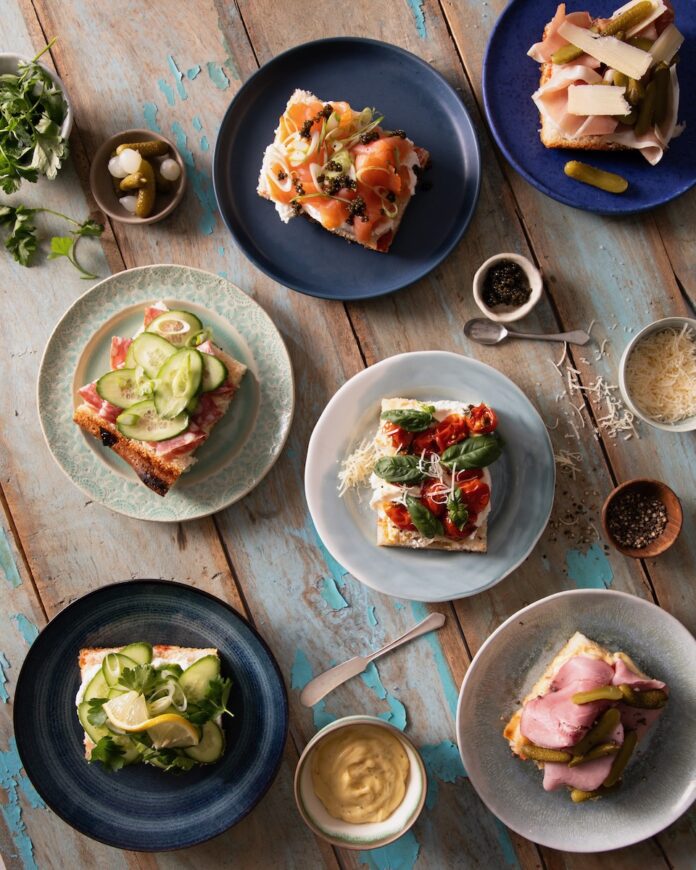
Various light blue and dark blue plates hold different types of focaccia sandwiches like cucumber, cream cheese and salmon, prosciutto, all on a blue and white picnic table.

Chef Selina Progar looked to her childhood idol Martha Stewart to make her Martha Stewart-Inspired Focaccia. Looking at the glorious results, it just makes sense to build delicious sandwiches with that homemade bread.

Selina Progar reminisces about watching Martha Stewart’s cooking shows growing up, admiring her bustling productivity and attention to detail. She says these viewing experiences, as well as poring over the wonderful Martha Stewart Living magazine, were important steps on her journey to becoming a food industry professional.

Focaccia makes a wonderful base for the best lunch or picnic sandwiches. Its butteriness and crispness combine beautifully with elements like herbed cream cheese, salmon, cornichons, prosciutto, cucumbers, and lemon ricotta. You can even use these Martha Stewart-Inspired Focaccia Sandwiches recipes as a starting point before adding on your own favorites like banana peppers, spinach, or balsamic dressing.

How to Rehydrate and Reheat Focaccia for These Sandwiches

Did you happen to make your focaccia using our Martha Stewart-inspired recipe a few days ago and now want to use it for your sandwiches? Good news is that it is super simple to reheat this homemade bread and bring it back to life. Simply run your loaf of focaccia lightly underneath water to bring moisture back into the fluffy inside of the bread and also help crisp the outside. Then, place on a baking sheet and bake in the oven at 350 degrees for around 8 to 10 minutes.

Print
clock clock iconcutlery cutlery iconflag flag iconfolder folder iconinstagram instagram iconpinterest pinterest iconfacebook facebook iconprint print iconsquares squares iconheart heart iconheart solid heart solid icon
Various light blue and dark blue plates hold different types of focaccia sandwiches like cucumber, cream cheese and salmon, prosciutto, all on a blue and white picnic table.

Martha Stewart-Inspired Focaccia Sandwiches


  • Author: Selina Progar

Description

A mix of creamy and salty makes the perfect sandwich.


Ingredients

Scale
  • Herbed cream cheese
  • Smoked salmon
  • Sliced green onions
  • Caviar or roe
  • Focaccia, cut into 3×4 rows, to yield 12 sandwiches then cut in half, if only using halves this will yield 24

For the herbed cream cheese:

  • 1 packet cream cheese
  • 2 tbsp finely chopped herbs like thyme and rosemary
  • 1 whole lemon, zested and juiced
  • Pinch of salt


Instructions

  1. Assemble sandwich as desired.

For the herbed cream cheese:

  1. Combine all ingredients and mix until smooth.
Print
clock clock iconcutlery cutlery iconflag flag iconfolder folder iconinstagram instagram iconpinterest pinterest iconfacebook facebook iconprint print iconsquares squares iconheart heart iconheart solid heart solid icon

Prosciutto and Cornichon Focaccia Sandwiches


  • Author: Selina Progar

Description

A sandwich that’s a little bit Italian and a little bit French!


Ingredients

  • Prosciutto
  • Cornichons
  • Finely shaved pecorino toscano
  • Focaccia, cut into 3×4 rows, to yield 12 sandwiches then cut in half, if only using halves this will yield 24


Instructions

  1. Assemble sandwich as desired.
Print
clock clock iconcutlery cutlery iconflag flag iconfolder folder iconinstagram instagram iconpinterest pinterest iconfacebook facebook iconprint print iconsquares squares iconheart heart iconheart solid heart solid icon

Ham and Cornichon Focaccia Sandwiches


  • Author: Selina Progar

Description

Don’t leave out the dijon mustard: its gentle spice and hint of acid help bring this lunch sandwich to life.


Ingredients

  • Dijon or grain mustard
  • Ham
  • Cornichons
  • Focaccia, cut into 3×4 rows, to yield 12 sandwiches then cut in half, if only using halves this will yield 24


Instructions

  1. Assemble sandwich as desired.
Print
clock clock iconcutlery cutlery iconflag flag iconfolder folder iconinstagram instagram iconpinterest pinterest iconfacebook facebook iconprint print iconsquares squares iconheart heart iconheart solid heart solid icon

Salami and Cucumber Focaccia Sandwiches


  • Author: Selina Progar

Description

The crunch of the cucumber with the creaminess of real butter and the delicious umami of salami has your next lunch covered.


Ingredients

  • Italian salami such as di parma, coppa, capicola, or guanciale, mixed or matched according to your preferences  
  • High fat butter like Pulgar or Amish roll butter
  • Thinly sliced cucumbers
  • Focaccia, cut into 3×4 rows, to yield 12 sandwiches then cut in half, if only using halves this will yield 24


Instructions

Assemble sandwich as desired with a generous spread of butter on the bottom.

Print
clock clock iconcutlery cutlery iconflag flag iconfolder folder iconinstagram instagram iconpinterest pinterest iconfacebook facebook iconprint print iconsquares squares iconheart heart iconheart solid heart solid icon

Lemon Ricotta and Cucumber Focaccia Sandwiches


  • Author: Star Laliberte

Description

The lemon ricotta creates a fresh and brightly flavored sandwich.


Ingredients

Scale
  • Lemon ricotta
  • Slice cucumbers
  • Parsley
  • Fresh lemon

For the lemon ricotta:

  • 8 oz ricotta
  • 1 lemon zest
  • Hardy pinch of salt


Instructions

  1. Assemble sandwich as desired.

For the lemon ricotta:

  1. Mix until smooth.

Cook Up the Rest of Selina’s Martha Stewart-Inspired Recipes

Angel Food Cake

One Pan Pasta

Keto Chicken Roll Ups

Five Spice Pumpkin Pie

Chicken Pot Pie

Apple Crostata with Cheddar Cheese Crust

Focaccia

Hot Cherry Tomato Salad

Recipe by Selina Progar
Photography by Dave Bryce

Subscribe to TABLE Magazine’s print edition.

Martha Stewart-Inspired Apple Crostata with Cheddar Cheese Crust

0
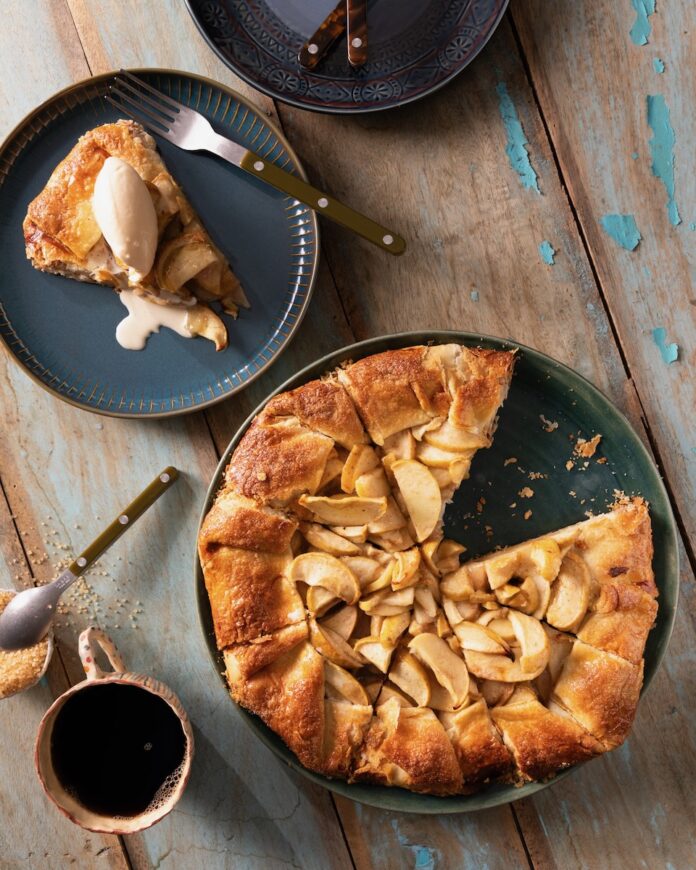
On a dark plate sits an Apple Crostada inspired by Martha Stewart which is made with a cheddar cheese crust. One slice has been cut out and sits on another plate with a scoop of ice cream on top.

Apples and cheese seemed destined for each other, with their delicious contrast of sweet and salty. This combination helped Chef Selina Progar, whose fascination with all things Martha ignited in childhood, dream up a Martha Stewart-Inspired Apple Crostata with Cheddar Cheese Crust. Her recipe is adapted from Martha Stewart’s Cheddar-Crusted Apple Pie.

The Martha and Chef Selina combine Granny Smith apples and cheddar cheese to make the perfect balance of sweet and savory adapts perfectly to crostata form, and is easier to make. The crostata lets the apples take center stage while a hint of sharp cheddar lingers. What could be better than serving this recipe up for an Italian picnic once spring starts to bloom?

What is a Crostata?

Much like a tart, this freeform Italian recipe leaves an open face to showcase the filling while still wrapping around the edges. The crostata was developed during an era when savory pies were all the rage in the pre-Christian era. However, you can always use a fruity or sweet filling if you choose. The best part about a crostata is you can make it without using a pie dish, just simply use a sheet pan instead. The product is a unique, rustic, crunchy treat with a warm filling.

Cook Up the Rest of Selina’s Martha Stewart-Inspired Recipes

Angel Food Cake

One Pan Pasta

Keto Chicken Roll Ups

Five Spice Pumpkin Pie

Chicken Pot Pie

Focaccia Sandwiches

Focaccia

Hot Cherry Tomato Salad

Recipe by Selina Progar
Photography by Dave Bryce

Subscribe to TABLE Magazine’s print edition.
Martha Stewart-Inspired Focaccia

0
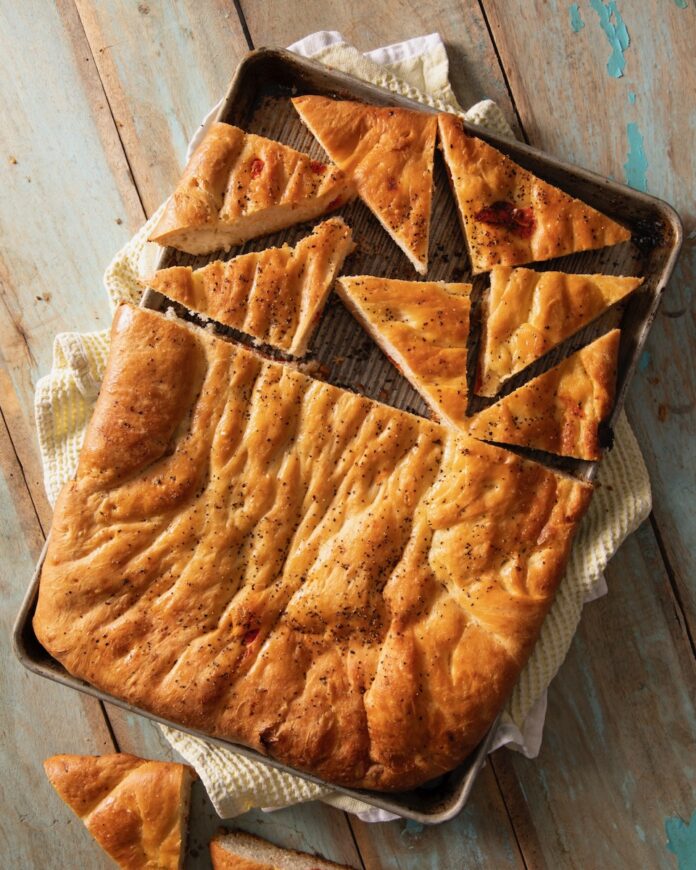
A sheet pan holds a Focaccia load inspired by Martha Stewart that's slices in half and then has half of one half slices into triangles.

Nobody does home-baked focaccia like the culinary queen Martha Stewart. Her perfectly golden and dense bread is already delicious but what if a few ingredients and a little extra time made it even better? Our Martha Stewart-Inspired Focaccia takes you through each step to make this process as easy as possible. Plus, it leaves room for a variety of toppings. Try adding in tomatoes in olive oil and basil, or caramelized onions and roasted garlic, or herbs like rosemary, thyme, and basil, or dried lavender and honey. Even if you choose to keep it simple with just sea salt over top, you’ll find the textures and flavors create a perfect bread for sandwiches or for serving alongside pasta.

What is Focaccia Anyways?

This rustic Italian bread is best known for its dimpled top and golden brown outside. It’s actually much like a pizza crust where you have a layer of crust surrounding a soft, bready center. Traditionally, it’s baked in a shallow pan, to allow the edges to crisp up while the center remains airy. You’ll find various regional variations incorporating ingredients like onions, tomatoes, or even figs. You’ll often find Focaccia as an antipasto, a side to soups and salads, or just on its own.

Print
clock clock iconcutlery cutlery iconflag flag iconfolder folder iconinstagram instagram iconpinterest pinterest iconfacebook facebook iconprint print iconsquares squares iconheart heart iconheart solid heart solid icon
A sheet pan holds a Focaccia load inspired by Martha Stewart that's slices in half and then has half of one half slices into triangles.

Martha Stewart-Inspired Focaccia


  • Author: Selina Progar

Description

Fresh baked bread, warm out of the oven, is always a home run.


Ingredients

Scale
  • .25 oz instant dry yeast (1 packet)
  • 1 tbsp honey
  • 20 oz warm water
  • 4 tbsp olive oil for #1
  • 2 oz olive oil for #2
  • 2–4 oz olive oil for #3
  • 6 cups bread flour (or 28.8 oz)
  • 1 tsp plus 1 tbsp salt
  • Large sea salt for sprinkling

Optional toppings:

  • Tomatoes cooked in olive oil and chiffonade basil
  • Caramelized onions and roasted garlic
  • Herbs- rosemary, thyme, basil (all stems should be removed and leaves finely chopped)
  • Dried lavender (after baking is done, brush with warm honey)


Instructions

  1. Using a digital thermometer, prepare warm water to 90 degrees C.
  2. In a mixing bowl, combine the warm water, dry yeast packet and honey. Mix thoroughly with a rubber spatula.
  3. Wait until the mix begins to look foamy as the yeast has bloomed.
  4. Add olive oil #1 (4 tbsp) then add all the flour. Mix with spatula until all the dry flour is incorporated.
  5. Finally, add salt.
  6. Place “dough” on the mixer with the dough hook attachment. Mix on the second speed for 2 minutes, then turn the mixer up to fourth speed for 6 more minutes. The dough should begin to look elastic and smooth.
  7. In separate large bowl, place olive oil #2 (2 oz). Scrape your dough into the bowl with the oil.
  8. Be sure to rub the oil over the dough. Then, place plastic wrap over the top of the bowl and place on top of the oven (preheated to 350 degree) or in a warm spot in your kitchen to rest until the dough begins to rise. Depending on where you place your bowl, this may take 30 minutes. Be patient.
  9. After, remove plastic wrap and gently, using both hands and push all your fingers into the dough to deflate it. Then, take the top half and fold it to the center. Repeat with the bottom half, then the right side and left side. Then, flip the entire dough over in the bowl so the dough’s seam is on the bottom.
  10. Place the plastic wrap back on the bowl, and allow to proof again until doubled in size. The dough should have a nice elastic texture, like fresh pizza dough. It should not be mealy or fragile.
  11. If the dough has the elastic texture, repeat this proof step one time. If it is mealy or fragile, repeat this proof until texture has changed.
  12.  Once dough has doubled in size and has an elastic texture, place 1/2 of olive oil #3 in the half sheet pan. Press all the dough into the pan using the fingers of both hands. Spread the dough to the edges of the pan. If the dough is too tough, let it rest for 10 minutes, then continue to press to the corners.
  13. Top with remaining oil and dimple with your fingers.
  14. Let proof again in a warm environment, not covered.
  15. At this point you may top your bread with toppings listed below, or simply sprinkle with large sea salt.
  16.  Preheat oven to 350 degrees.
  17. Once bread is proofed and doubled in size again, bake for a total of 30 minutes. Rotate the pan at the 15 minute mark.
  18. Let cool enough to handle, and serve immediately.

Cook Up the Rest of Selina’s Martha Stewart-Inspired Recipes

Angel Food Cake

One Pan Pasta

Keto Chicken Roll Ups

Five Spice Pumpkin Pie

Chicken Pot Pie

Focaccia Sandwiches

Apple Crostata with Cheddar Cheese Crust

Hot Cherry Tomato Salad

Recipe by Selina Progar
Photography by Dave Bryce

Subscribe to TABLE Magazine’s print edition.
Martha Stewart-Inspired Hot Cherry Tomato Salad

0
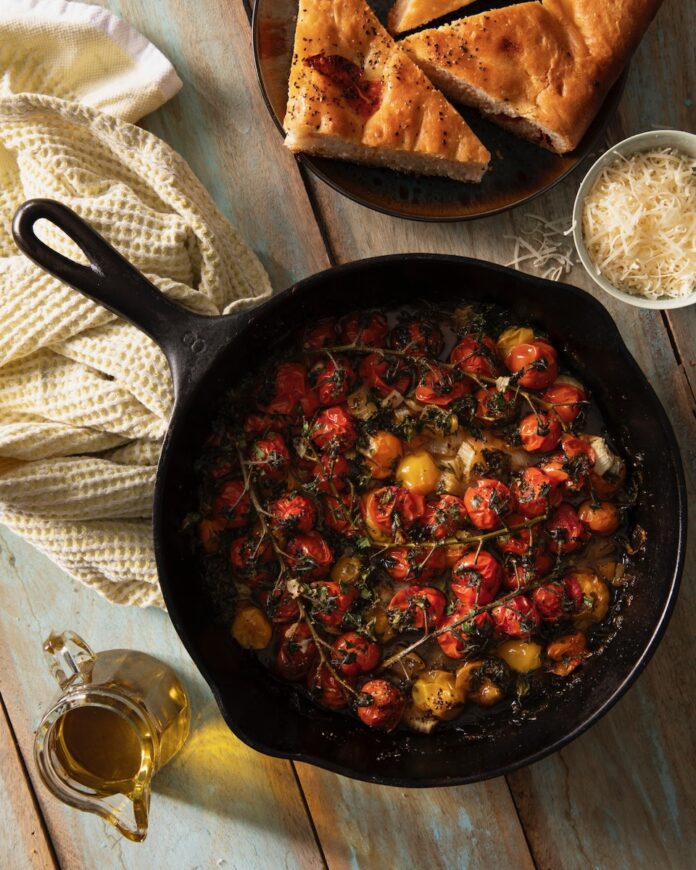
In a cast iron skiller sits a hot cherry tomato salad with cherry tomatoes and herbs as focaccia bread, cheese, and oil sit off to the side.

A Hot Cherry Tomato Salad improves any lunch or dinner with the warmth of roasted tomatoes and onions. We’ve adapted this recipe from one of our favorite chefs, Martha Stewart. Selina Progar, creator of this recipe, would watch Martha Stewart’s show when she was a child and write down the recipes to cook for her family. From this, she recently rediscovered a similar recipe to this one and made up this new variation just for us. Plus, this Hot Cherry Tomato Salad is perfect alongside our recipe for Martha Stewart-Inspired Focaccia. How can you not adore a meal where crusty bread gets drenched in olive oil, tomatoes, and fresh herbs. Plus, if you serve it this dish as an antipasto, it can really set the scene for the dinner to follow, especially if it’s an Italian pasta recipe.

How Can I Clean My Cast Iron Skillet After Making This Hot Cherry Tomato Salad?

You’ve probably heard the big no-nos with cast iron skillets, you cannot wash them like normal. Unlike most skillets, water is this one’s worst enemy since it can cause the pan to rust very easily. Try to avoid soaking at all costs! You want to be gentle to keep the pan’s seasonings in tact. So, carefully scrap out any excess food when it’s still warm and quickly rinse with warm water. If by chance there is food stuck to the skillet you can use a chainmail scrubber or gently heat warm water in it to help. Either way you want to dry your skillet right after washing and then rub a small amount of oil onto the pan. Just be sure no oil residue remains after.

Print
clock clock iconcutlery cutlery iconflag flag iconfolder folder iconinstagram instagram iconpinterest pinterest iconfacebook facebook iconprint print iconsquares squares iconheart heart iconheart solid heart solid icon
In a cast iron skiller sits a hot cherry tomato salad with cherry tomatoes and herbs as focaccia bread, cheese, and oil sit off to the side.

Martha Stewart-Inspired Hot Cherry Tomato Salad


  • Author: Selina Progar

Description

Cold salads are so last year.


Ingredients

Scale
  • ½ lb cherry tomatoes (preferably with stems)
  • 1 bunch parsley, washed and finely chopped
  • ¼ cup olive oil
  • 1 vidalia onion, diced small
  • Salt and pepper to taste
  • Basil leaves for garnish


Instructions

  1. Rinse off cherry tomatoes. Pat dry with a paper towel.
  2. In a cast iron skillet, place tomatoes, chopped onions, and chopped parsley.
  3. Add olive oil and generously season with salt and pepper.
  4. Place in the oven at 350 degrees and bake for about 20 minutes or until the tomatoes are soft and onions are fully cooked.
  5. Remove from oven and garnish with basil leaves.
  6. Serve with focaccia or crusty bread.

Cook Up the Rest of Selina’s Martha Stewart-Inspired Recipes

Angel Food Cake

One Pan Pasta

Keto Chicken Roll Ups

Five Spice Pumpkin Pie

Chicken Pot Pie

Focaccia Sandwiches

Apple Crostata with Cheddar Cheese Crust

Focaccia

Recipe by Selina Progar
Photography by Dave Bryce

Subscribe to TABLE Magazine’s print edition.

Seared Scallops with Warm Corn & Chorizo Salsa

0
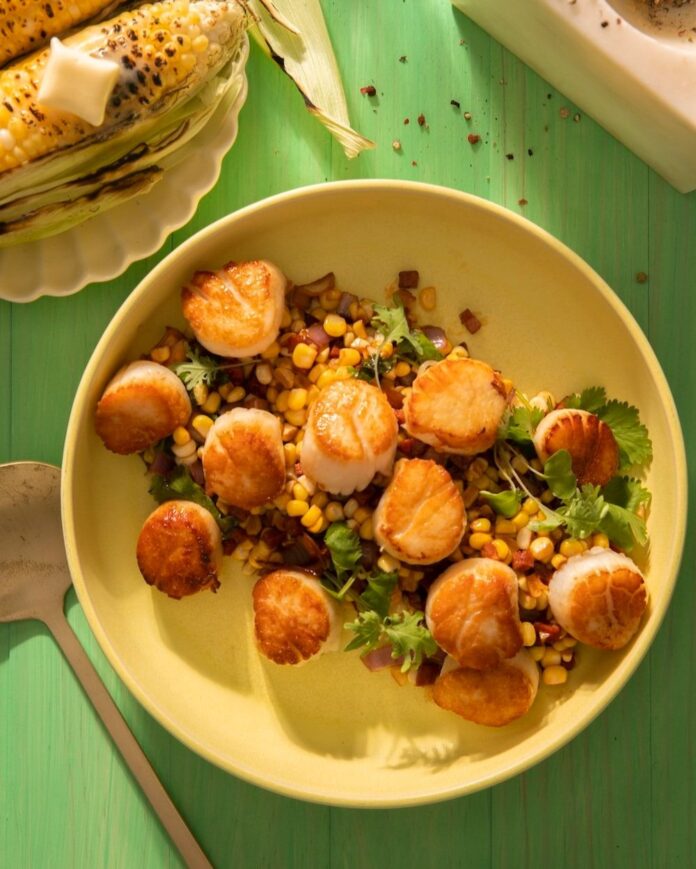
Seared Scallops with Warm Corn & Chorizo Salsa on a yellow dish with green background.

Seared Scallops with Warm Corn & Chorizo Salsa is a delightful summer entrée where the salty sweetness of perfectly seared scallops beautifully contrasts the earthy sweetness of fresh corn. Both flavors get a rich and smoky lift from the spice and fat of chorizo in the warm salsa, creating a harmonious balance that’s both satisfying and vibrant. This dish is easy to prepare but impressive enough to serve at any summer gathering or casual weeknight dinner. During the summer season, many local farms and farm stands offer fresh corn at its peak, which makes all the difference in flavor and texture. If you happen to be near Monongahela, be sure to check out Triple B Farms, known for their exceptional produce and commitment to quality. For more information, visit triplebfarms.com.

Why Chorizo Salsa?

Chorizo salsa adds a bold, smoky depth to any dish, perfectly complementing both seafood and vegetables. Its spicy, savory flavors come from rich, seasoned pork sausage, which brings warmth and complexity to the salsa. This versatile topping enhances summer meals by adding a satisfying kick and hearty texture. Whether paired with fresh corn or seared scallops, chorizo salsa transforms simple ingredients into a flavorful, memorable dish.

Why Scallops Shine in Any Dish

Scallops are one of the ocean’s finest treasures — tender, sweet, and luxuriously buttery when cooked just right. Their delicate flavor makes them the perfect canvas for bold or simple pairings, from bright citrus to smoky chorizo. Whether you’re searing them to golden perfection or trying a new preparation, scallops always impress. Looking for more inspiration? Check out another delicious scallop recipe here to bring even more ocean elegance to your table.

Print
clock clock iconcutlery cutlery iconflag flag iconfolder folder iconinstagram instagram iconpinterest pinterest iconfacebook facebook iconprint print iconsquares squares iconheart heart iconheart solid heart solid icon
Seared Scallops with Warm Corn & Chorizo Salsa on a yellow dish with green background.

Seared Scallops with Warm Corn & Chorizo Salsa


  • Author: Anna Franklin

Description

Seared scallops meet a warm, smoky-sweet corn and chorizo salsa in this easy, summer-perfect dish bursting with fresh, local flavors.


Ingredients

Scale
  • 1 lb scallops
  • 2 tbsp butter
  • 1/2 red onion, diced
  • 2 cloves garlic minced
  • 1/2 cup diced, dry-cured chorizo
  • 2 ears corn, cut off the cob
  • 1 lime, juiced
  • 1/4 cup cilantro sprigs


Instructions

  1. Pat scallops dry with a paper towel, season with salt.
  2. Sear in a nonstick pan over high heat, 3 minutes on first side until a golden crust forms, flip and finish cooking for 1 minute. Remove scallops and set aside.
  3. Add onion, garlic, chorizo, and corn into same pan and toss quickly just until everything warms through.
  4. Put warm salsa on serving platter and drizzle with lime juice. Garnish with cilantro sprigs


Recipe and Styling by Anna Franklin
Story by Keith Recker
Photography by Dave Bryce

With the support of Buy Fresh, Buy Local of Western Pennsylvania and PA Preferred

Subscribe to TABLE Magazine‘s print edition.

Juniper Lemonade Tonic

0
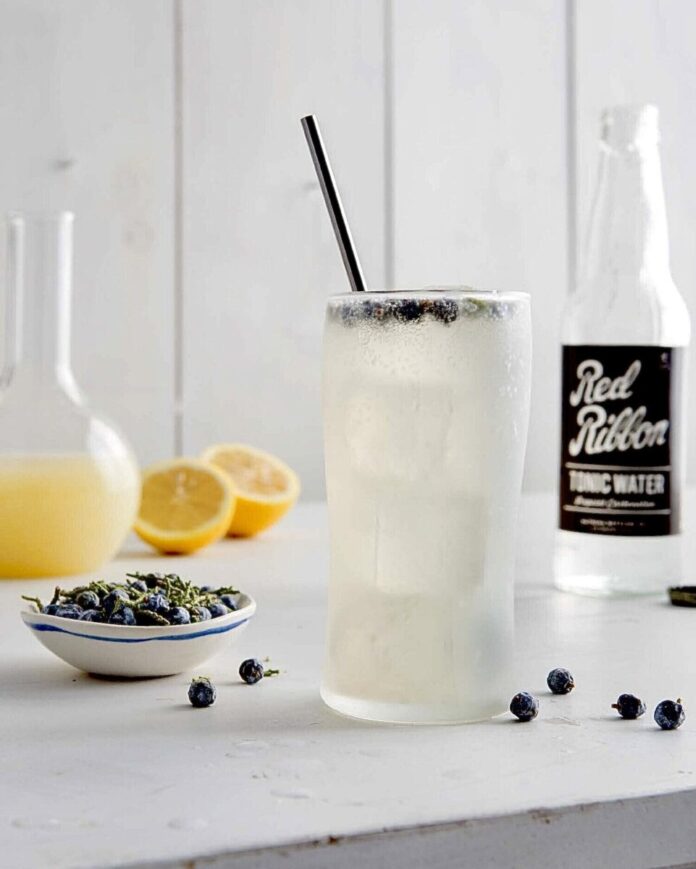
A juniper lemonade tonic sits on a table with juniper berries for a garnish and around it as well as lemons and a bottle of red ribbon soda.

Juniper berries, lemon, and tonic mix in this crafty cocktail created by longtime TABLE contributor Quelcy Kogel. She uses Red Ribbon Tonic Water, which is a bit on the sweeter side (to our benefit!). It’s the perfect tonic to add to any of our favorite spirits, especially when it’s combined with a juniper simple syrup that mimics the flavors of a good, dry gin. Follow the cocktail recipe below and add your favorite gin for a refreshing, fruity happy hour.

How to Have This Juniper Lemonade Tonic as a Mocktail

There are a couple of different ways you can mix up this Juniper Lemonade Tonic to be a mocktail. Simply take out the gin and use only the juniper syrup, lemon juice, and tonic water. Or, another solution is to sub the gin for a zero-proof version, Try adding in Ritual’s Non-Alcoholic Gin Alternative or Monday Zero Alcohol Gin.

Print
clock clock iconcutlery cutlery iconflag flag iconfolder folder iconinstagram instagram iconpinterest pinterest iconfacebook facebook iconprint print iconsquares squares iconheart heart iconheart solid heart solid icon
A juniper lemonade tonic sits on a table with juniper berries for a garnish and around it as well as lemons and a bottle of red ribbon soda.

Juniper Lemonade Tonic


  • Author: Quelcy Kogel

Description

Whether you have this recipe as a cocktail or mocktail we promise it’ll brighten your day!


Ingredients

Scale
  • 2 oz gin
  • 4 oz fresh squeezed lemon juice
  • 1/2 to 1 oz juniper syrup
  • Red Ribbon Tonic Water
  • Juniper berries (optional)

For the juniper syrup:

  • 1 cup granulated sugar
  • 1/2 cup water
  • 3 tsp juniper berries
  • 3 bay leaves, slightly crushed


Instructions

  1. In a Collins glass, combine the gin, lemon juice and syrup over ice.
  2. Top with tonic, garnish with juniper berries, and serve.

For the juniper syrup:

  1. Combine sugar, water, juniper berries, and bay leaves in a small saucepan; stir to disolve sugar. Bring to a boil over medium-high heat.
  2. When mixture boils, reduce the heat to medium and simmer until mixture is slightly thickened, about 5 minutes.
  3. Remove from heat and let steep 15 to 20 minutes. Strain syrup to remove herbs, and transfer to a container with a tight-fittting lid. Cover and refrigerate until ready to use.

Recipe and Styling by Quelcy Kogel
Photography by Adam Milliron

Subscribe to TABLE Magazine‘s print edition. 

Pawpaw Sweet Bread

0
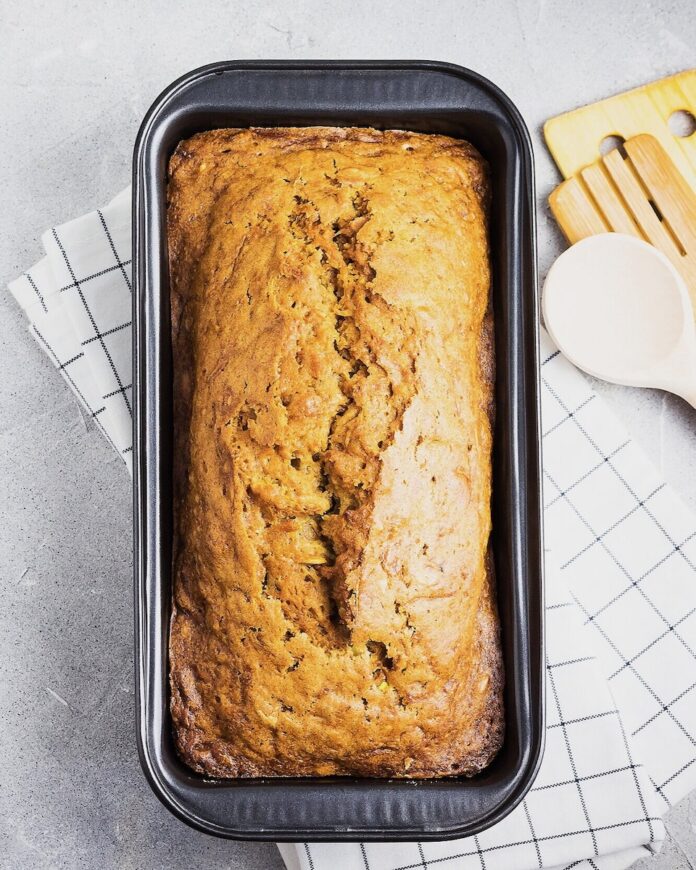
A loaf of Pawpaw Sweet Bread in an orange color sits in a loaf pan on a white towel and counter.

The texture of the pawpaw in this Sweet Bread recipe leads to a moist, custard-like bread reminiscent of bread pudding. As such, it’s delicious with a dollop of fresh whipped cream or our custard sauce.

What Are Pawpaws?

You may have known that pawpaws are a mango-like fruit native to North America, but did you know that they are also a very nutritious fruit option when it comes to mealtime? They are high in vitamin C, magnesium, iron, copper, and manganese with significant amounts of riboflavin, niacin, calcium, phosphorus, and zinc, and a good source of potassium and several essential amino acids.

Mature pawpaw fruit can grow up to six inches in length and resemble a bean-shaped mango with smooth skin that also changes from green to yellow as it ripens. Similar to bananas, dark flecks may appear and the skin may turn brown or even black when very ripe.

Their soft, mango-like texture make for a perfect ingredient in breads, too. Just make sure you let them ripen. Near-ripe fruit will keep up to two weeks in the refrigerator; let sit at room temperature to fully ripen before using.

Print
clock clock iconcutlery cutlery iconflag flag iconfolder folder iconinstagram instagram iconpinterest pinterest iconfacebook facebook iconprint print iconsquares squares iconheart heart iconheart solid heart solid icon
A loaf of Pawpaw Sweet Bread in an orange color sits in a loaf pan on a white towel and counter.

Pawpaw Sweet Bread


  • Author: Local Goodness LLC

Description

This mango-esc fruit melds perfectly with a classic sweet bread recipe.


Ingredients

Scale
  • 3 cups all purpose flour
  • 1 tsp baking soda
  • ¾ tsp salt
  • ½ tsp ground cinnamon
  • ½ tsp freshly ground nutmeg
  • 3 eggs, slightly beaten
  • ¾ cups sugar
  • 1 cup lite unsweetened coconut milk (may substitute with ½ cupvegetable oil)
  • 2 tsp vanilla extract
  • 1½ to 2 cups mashed pawpaw pulp (can use frozen)

For the custard sauce:

  • 1/8 cup sugar
  • 3 egg yolks
  • 1⁄2 cup skim milk
  • 1⁄2 tsp vanilla extract


Instructions

  1. Preheat oven to 350 degrees.
  2. In a large mixing bowl, stir together the flour, baking soda, salt, cinnamon, and nutmeg.  Make a well in the middle of the dry ingredients.
  3. In a separate bowl, beat together the eggs and sugar. Stir in remaining ingredients until well mixed and into the center of the dry ingredients. Stir until incorporated and dry ingredients are moistened, but don’t over mix.
  4. Pour batter into two greased medium-size loaf pans. Bake for 60-70 minutes, or until golden brown and set.
  5. Remove and let cool 20 minutes before removing from pans. Slice and serve with fresh whipped cream or custard sauce.

For the custard sauce:

  1. In a medium saucepan whisk together the egg yolks and sugar until creamy. Stir in the milk and vanilla.
  2. Once all ingredients are combined, cook over low heat, stirring constantly, until the custard thickens and coats the back of a wooden spoon (approximately 7 minutes).
  3. Serve warm or let cool, covered with plastic wrap, in the refrigerator.

Recipe by Local Goodness LLC
Story by Rhonda Schuldt

Subscribe to TABLE Magazine‘s print edition.

Asparagus Ravioli

0
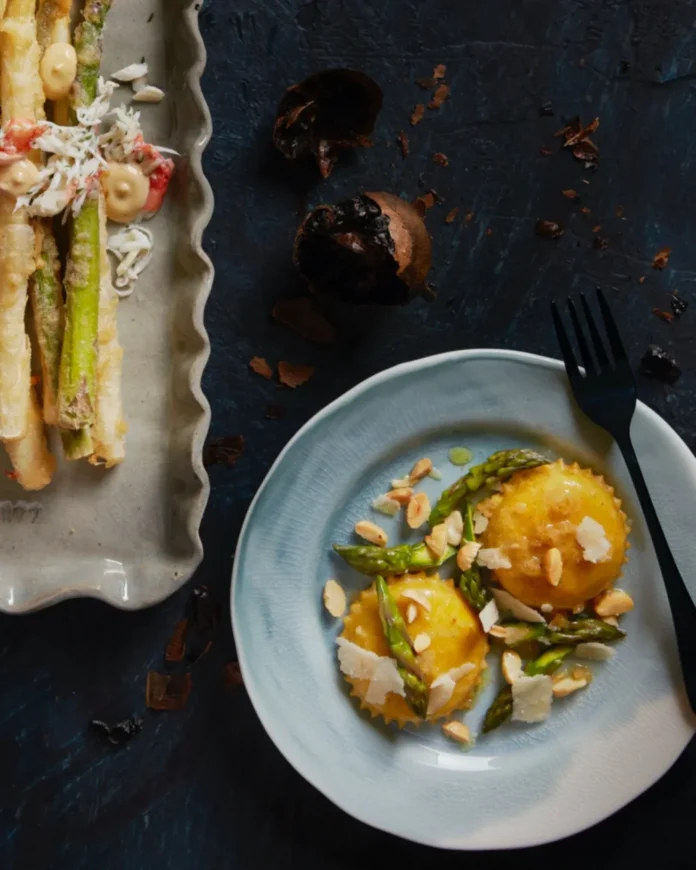
An above shot of Asparagus ravioli on a small white plate.

Celebrate asparagus season in the most delicious way with this handmade Asparagus Ravioli recipe—complete with a zesty preserved lemon vinaigrette that adds a bright, unexpected twist. From kneading silky egg pasta to blending a rich, creamy filling of asparagus, Parmesan, and cream cheese, this dish is a rewarding kitchen project that turns simple ingredients into something truly special. Whether you’re looking for a spring dinner centerpiece or a fresh take on homemade pasta, this Asparagus Ravioli delivers vibrant flavor, impressive presentation, and the satisfaction of scratch cooking.

Print
clock clock iconcutlery cutlery iconflag flag iconfolder folder iconinstagram instagram iconpinterest pinterest iconfacebook facebook iconprint print iconsquares squares iconheart heart iconheart solid heart solid icon
An above shot of Asparagus ravioli on a small white plate.

Asparagus Ravioli


  • Author: Kristin Butterworth

Description

Celebrate asparagus season in the most delicious way.


Ingredients

Scale

Egg Pasta

  • 2 ½ cups 00 farina flour
  • ¾ tsp kosher salt
  • 2 whole eggs
  • 3 egg yolks
  • 1 tbsp olive oil

Asparagus Ravioli Filling

  • 1 lb asparagus, roughly chopped
  • 6 tbsp cream cheese
  • ¼ cup Parmesan cheese
  • ½ tsp minced garlic
  • Salt and pepper, to taste

Preserved Lemon Vinaigrette

  • 1/3 cup olive oil
  • ¼ cup lemon juice
  • 1 tsp Dijon mustard
  • ½ tsp honey
  • 3 tbsp preserved lemon, brunoise-cut or small dice
  • Salt and pepper, to taste


Instructions

Egg Pasta

  1. In a KitchenAid or similar mixer combine the flour and salt. Add eggs, yolks, and oil and run the machine until the dough holds together. If dough looks dry, add another teaspoon olive oil. If dough looks wet, add a little flour until dough is tacky and elastic.
  2. Dump dough onto a work surface and knead briefly until very smooth. Wrap in plastic and rest at room temperature for 40 minutes.
  3. Cut the dough into 4 pieces, keeping them covered with plastic wrap or a dishtowel when not in use. Using a pasta roller, set to the thickest (widest) setting, roll one piece of dough out onto a sheet. Fold the sheet in thirds like a letter and pass it through the machine 2 more times on the same setting.
  4. Reduce the setting, and repeat rolling and folding the dough, passing it through the machine until you reach the “number 2” thickness.
  5. Cut the pasta into desired size for the raviolis. Place cut pasta on a flour-dusted sheet tray and cover with a dishtowel while rolling and cutting the remaining dough. Make sure to sprinkle flour over the cut pasta before you place another layer on top.

Asparagus Ravioli Filling

  1. Bring a medium pot of well-salted water to a boil over high heat. Have ready a bowl of ice water to shock the asparagus to stop the cooking process. Boil the asparagus tips until tender but still bright green, about 2 minutes. With a slotted spoon, transfer to the ice water. When cool, transfer with the slotted spoon to a small bowl and set aside. In a food processor (or by hand), chop the asparagus very finely and transfer to a medium bowl. Add the cream cheese, Parmesan, and garlic to the chopped asparagus; mix well. Season to taste with salt and pepper.
  2. For the ravioli: Arrange your cut pasta on a work surface. Put 1 level tablespoon of the asparagus filling in the center of each piece of dough. Using a spray bottle, moisten the edges of each with water. Top each with another piece of pasta and press the edges firmly to seal, expelling any air bubbles as you seal. If you don’t plan to cook the ravioli immediately, cover them with a damp cloth or freeze until ready to use.

Preserved Lemon Vinaigrette

  1. Combine all ingredients in a small mixing bowl with a whisk. The honey and Dijon should emulsify the vinaigrette but you will need to mix before serving. Feel free to adjust the dressing with salt and pepper and maybe some additional honey if needed.

Recipe and Food by Chef Kristin Butterworth
Story and Prop Styling by Keith Recker
Photography by Dave Bryce

Subscribe to TABLE Magazine‘s print edition.

Watermelon Steak Salad

0
An above shot of a bowl filled with brightly colored fruit, making up a watermelon steak salad.

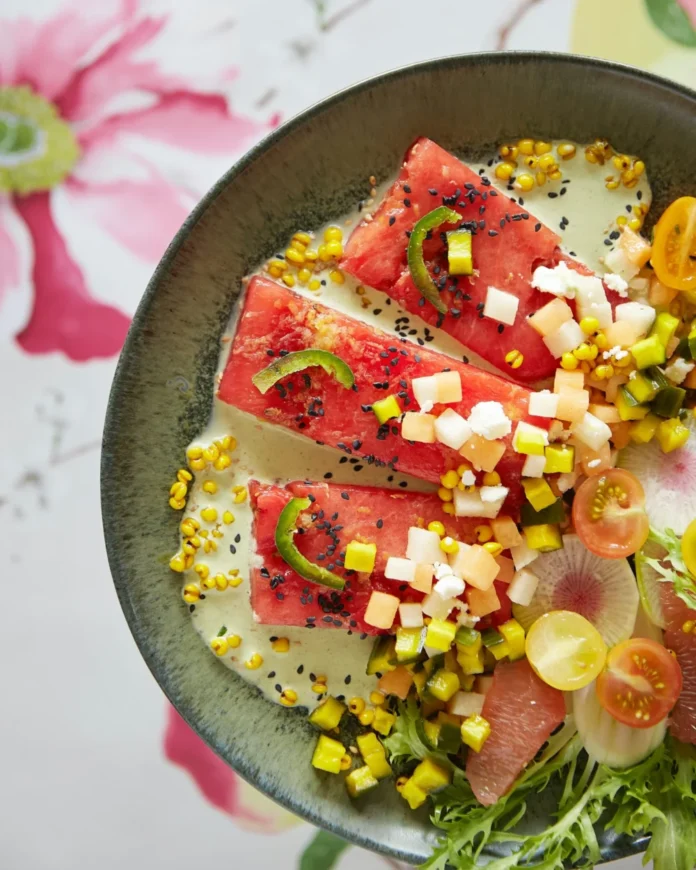
Watermelon has always been that one fruit that can spark up nostalgia for me: it’s a remembrance of summer evenings or afternoon family picnics. On any given summer night, my mother and father would have a watermelon wedge waiting for me; it was just something that was always there. It’s also one of those ingredients that tends to go well with a variety of flavors. Be it spicy, salty, tart, acidic, or bitter – they all seem to work. This time of year is great for many other fruits and vegetables – tomatoes, radish, bitter greens, and other melon varieties – which, luckily, all complement watermelon very well. This Watermelon Steak Salad dish will show that although watermelon is great on its own, there are many flavor profiles that pair great with it, too.

Story by Maggie Weaver
Photography by Dave Bryce
Food Styling by Veda Sankaran
Prop Styling by Keith Recker
Recipe by Chef Steve Paul
Wallpaper: Guermantes by Manuel Canovas, Courtesy of Cowtan & Tout

Subscribe to TABLE Magazine‘s print edition.

Don't Miss