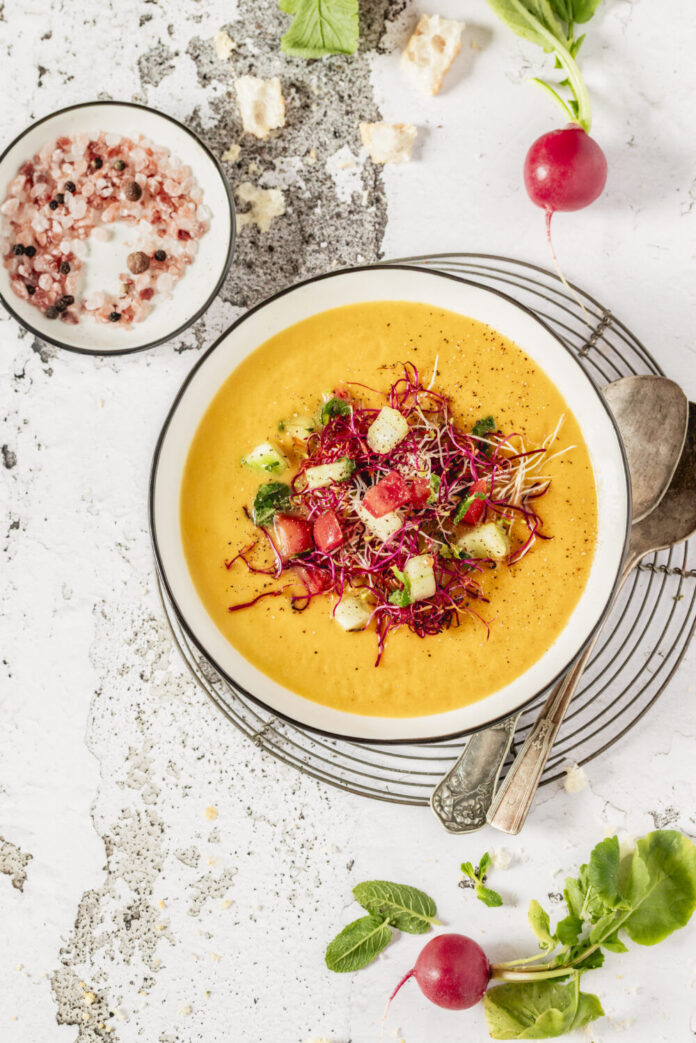
Sara Ghedina’s Cantaloupe Peach Gazpacho, her take on the Andalusian soup, will surprise you. The sweetness of cantaloupe and peaches is balanced by the tartness of lemon juice, while garlic, shallots, olive oil and chili pepper provide savory counterpoint. She tops each chilled bowl with cucumber and tomato slices and a few colorful sprouts. You could, however, gently fry some prosciutto slices until crispy and add them just before serving. Add a couple of mint leaves and some freshly ground black pepper to this Cantaloupe Peach Gazpacho recipe and…You’ll be in heaven.
What is Gazpacho?
Think of it as the perfect edible air conditioner. Gazpacho is a cold Spanish soup made primarily from raw, blended vegetables. It’s especially popular in the hot summer months, particularly in the southern region of Andalusia. Everything is blended together and chilled before serving. The result is refreshing, tangy, and packed with fresh veggie flavor, or, like in this Cantaloupe Peach Gazpacho recipe, balanced by the sweetness of fruit. It’s usually served as an appetizer and sometimes garnished with chopped vegetables, herbs, or croutons.
Peel peaches and cut them in chunks along with cantaloupe and cucumber. Place them in a blender, add garlic clove and shallot, lemon juice, balsamic vinegar, olive oil, chili flakes, mint leaves, salt and pepper. Blend until smooth.
Pour gazpacho in a large bowl, cover with plastic wrap and let it sit in the fridge for at least one hour to allow flavors to blend.
Pour the soup in individual bowls, and garnish with cucumber and tomato slices, sprouts, and a drizzle of extra-virgin olive oil, or else with some crumbled prosciutto, mint leaves and freshly ground black pepper, as explained above.
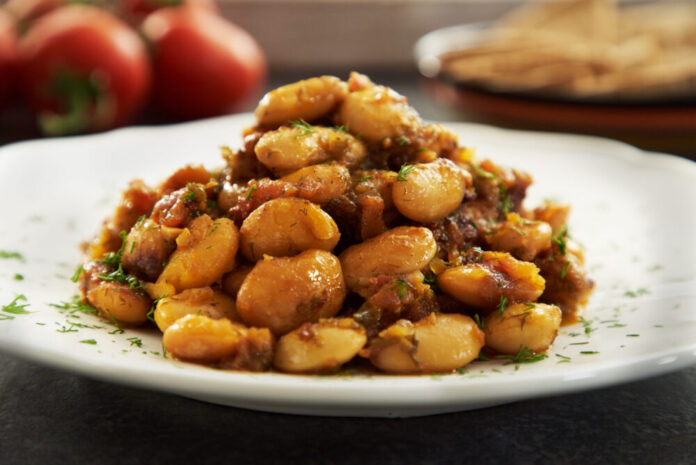
This is a comforting dish in the fall/winter, served hot or warm, but equally satisfying in the spring/summer, served at room temperature. Buy gigantes (giant) beans from a Greek food purveyor and favor fresh chopped tomatoes over canned plum tomatoes for a slightly sweeter, fresher taste. This is one of Diane Kochilas’s most beloved recipes, which she notes can be served as an appetizer, vegetarian main course, side dish or meze, and “marries well with everything from tomatoes to feta to spinach.”
Giant Beans Vs. Regular Beans
Giant beans are big and buttery. They soak up flavor like sponges and add a meaty, satisfying bite to soups, stews, and braises. Meanwhile, regular beans, like black or pinto, are smaller and ideal for quick-cooking. They’re versatile and perfect for everyday dishes like chili and salads.
This is a comforting dish in the fall/winter served hot or warm, but equally satisfying in the spring/summer served at room temperature.
Ingredients
Scale
1 lb / 450 g dried Greek giant beans
1/2 cup / 125 ml extra-virgin Greek olive oil, and more as needed or desired
3 medium-large red onions, chopped
1 garlic cloves, chopped
2 carrots, peeled and whole
4 bay leaves
3 cups plum tomatoes, peeled, seeded, chopped
4 tbs Ikarian or other Greek pine honey, divided
1 bunch fresh dill, chopped
2 – 4 tbs Greek balsamic vinegar, to taste
2 tbs Santorini or other Greek tomato paste
Salt and freshly ground pepper
2 – 3 tbs crumbled feta for garnish
Instructions
Soak the beans overnight in ample water. Drain the next day. Place in a large pot with cold water and bring to a boil. Lower heat and simmer, skimming the foam off the top. Simmer beans for 1-1½ hours, until tender but firm. Remove beans from heat and drain but reserve the water.
Preheat oven to 375 degrees. Place beans in a large baking pan with 6 tablespoons extra-virgin Greek olive oil. Mix the onions, garlic, carrot, bay leaves, and the tomatoes. Stir in about 1½ cups of the bean cooking liquid, just enough to barely cover the beans. Stir in half the honey. Mix thoroughly. Cover the pan with parchment then aluminum foil and bake for about 1 – 1½ hours, or until the beans are tender and the sauce is thick and creamy. Add more water throughout baking, if necessary, to keep the beans from drying out.
15 minutes before removing from oven, add vinegar, tomato paste, salt and pepper. As soon as the beans come out of the oven, stir in additional honey and vinegar to taste as well as the chopped dill.
Serve hot, warm or at room temperature, sprinkled with crumbled feta if desired and drizzled with additional olive oil.
Story by Cally Jamis Vennare Photography and recipe by Diane Kochilas
A refreshing twist on late-summer sweetness, this Husk Cherry and Melon Sorbet recipe is sunshine in scoopable form. Juicy cantaloupe (or honeydew) meets the tropical, tomato-like tang of husk cherries for a flavor that’s both unexpected and irresistible. With just a handful of ingredients and minimal effort, this recipe transforms ripe fruit into a smooth, spoonable treat perfect for hot days and easy entertaining.
Sorbet vs. Ice Cream: What’s the Difference?
Unlike ice cream, which is made with a base of cream, milk, and often eggs, sorbet contains no dairy or eggs. It’s made of just fruit, sugar, and water. This gives sorbet its signature light and icy texture, along with a more intense, undiluted fruit flavor. Because it’s free of fat and air (both of which are whipped into ice cream), sorbet is naturally vegan and often lower in calories. It’s also a great option for people who are lactose intolerant or avoiding dairy. Sans custard and cream, sorbet, especially this Melon Sorbet, is surprisingly easy to make at home.
2 1/2 pounds cantaloupe or honeydew melon—peeled, seeded, and cut into 1-inch pieces
2 cups husk cherries, husk removed
Instructions
In a small saucepan, combine the sugar, corn syrup, and water and bring to a boil. Cook over moderate heat until the sugar dissolves, about 2 minutes.
Remove from the heat. Let stand until cool, 30 minutes.
In a blender, puree the cantaloupe and husk cherries until smooth. You should have 3 cups of puree.
Stir in the sugar syrup. Pour the mixture into an ice cream maker and freeze according to the manufacturer’s instructions.
Pack the melon sorbet into an airtight plastic container. Press a sheet of plastic wrap directly onto the surface of the sorbet, cover, and freeze until firm, about 4 hours. Scoop into bowls and serve.
Notes
If you do not have an ice cream machine, you can add the sorbet mixture to a large ziplock freezer bag and freeze for 8 hours, shaking the bag every hour or so.
TABLE contributor Sara Ghedina was born in Italy and moved to San Francisco after university. She’s now living just outside of Venice. Her thoughts on food are a wonderful combination of the place of her birth and the place she chose to live for many years. Read her article on easing up on our meat consumption — along with a recipe for vegan Mushroom Soup. It’s just as delicious as this recipe for vegan Lentil Bolognese.
What Are the Nutritional Benefits of Lentils?
Lentils are nutritional powerhouses! Packed with plant-based protein, they provide a satisfying alternative to meat. Lentils are high in fiber, which promotes healthy digestion, helps regulate blood sugar levels. Because high-fiber foods help us feel full for longer amounts of time, they are ideal for weight management. Rich in essential minerals such as iron, magnesium, and potassium, lentils support energy production, heart health, and balanced blood pressure. Their folate content is especially important for pregnant women, aiding in fetal development and preventing birth defects. Naturally low-fat and cholesterol-free, lentils are a heart-friendly food that can reduce the risk of cardiovascular disease.
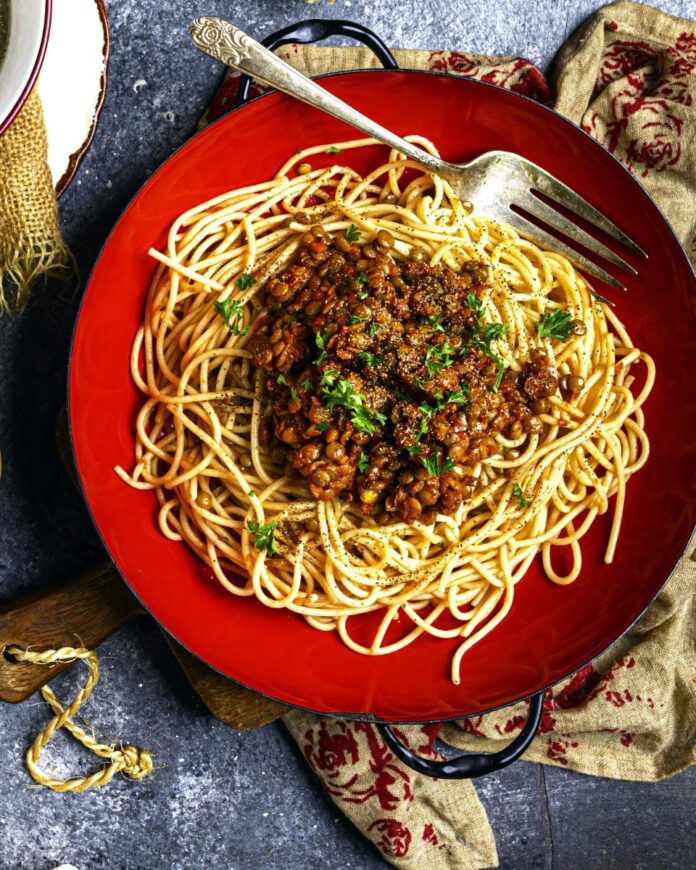
A hearty vegan pasta sauce made the traditional Italian way, using protein-packed lentils instead of ground meat. Filling and delicious, it uses common pantry ingredients that surprise with a lot of flavor. These lentils are good as pasta sauce but also on their own, with some veggies on the side.
Ingredients
Scale
28 oz (1 large can) whole peeled tomatoes
5 tbsp extra-virgin olive oil
1 onion, finely chopped
3 garlic cloves, minced
1 carrot, diced
2 celery stalks, diced
Salt and pepper, to taste
3/4 lb green lentils, rinsed and drained
3/4 cup red wine
1 tbsp tomato paste
2 bay leaves
3 to 4 fresh thyme sprigs, leaves only
2 cloves
Instructions
Puree tomatoes using a food mill, reserving all their juice, and set aside.
Heat a large pan over medium heat. Once hot, add oil, onion, and garlic. Sauté for 2 to 3 minutes, stirring frequently, until slightly soft and fragrant.
Add carrots and celery and season with a pinch of salt and black pepper to taste. Cook for 3 to 4 minutes more, add lentils and wine, and stir until the liquid is evaporated. Add tomato puree, tomato paste, herbs and spices and more salt and pepper if needed.
Bring the sauce to simmer, then reduce heat to low-medium and continue cooking until lentils are tender, stirring occasionally. It will take about 30 to 40 minutes, depending on the lentils. Add a bit more water or vegetable stock if the mixture gets too thick. Use the sauce with spaghetti or your favorite type of pasta, or eat these lentils on their own with a side of veggies.
Notes
If you miss the taste of the real deal, try using one of the plant-based meat alternatives that are now available in lieu of the lentils, and you won’t be able to tell the difference with the classic Italian “ragù.”
Story, Recipe, Styling and Photography by Sara Ghedina
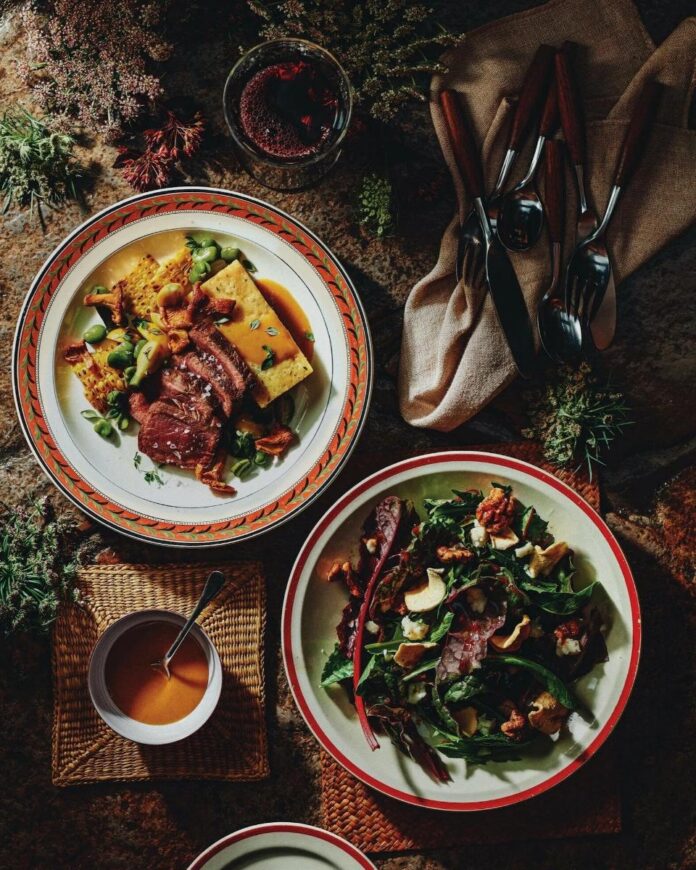
Inspired by Fallingwater, Chef Tom Shuttlesworth dove into the delicious food history and recipes of what is considered to be the finest American house of 20th century. Legendary Fallingwater cook Elsie Henderson inspired him! Shuttlesworth drew upon house archives preserved by the Western Pennsylvania Conservancy, from local traditions, and his own family lore. The menu he devised moves from fresh, local salad to venison with an intriguing sauce, polenta and summer vegetables.
Tasting Forest to Table Recipes at Fallingwater
As you can see, Chef Tom’s approach to food is intuitive, bold-flavored, and delicious. Thanks for sharing your gifts with TABLE readers, Chef! You might start this magnificent meal off with Chef Tom’s recommendations for a light aperitif and some small plates.
Dandelion Greens & Red Chard Salad
We happened to have dandelion greens available the day we made this meal, as well as local red chard. You could, however, use any number of different lettuces, or mixes: romaine, radicchio, endive, and kale will all work well. I make my own dried apples at home with our handy dehydrator. However, they can also be purchased at most gourmet shops, natural food shops, or online. We used goat cheese, but any harder, aged cheese that can be grated or peeled into strips would be fine. The possibilities run from a quality Parmesan to a Manchego, and beyond! I usually pre-grate or shave the cheese in preparation for the final salad.
For Final Preparation and Plating:
Before you begin, establish your mise en place: lettuce(s), dressing, walnuts, dried apples, grated or shaved cheese, salt and pepper. Salads need little instruction, but for the inquisitive: I always put all the greens (about 5 to 6 loosely packed cups for four people) in a large bowl, add the dry ingredients and set aside until just before the salad is needed. Dressing too soon will make for a wilted salad. When the time is ready, mix with your dressing, and then add your cheese – it distributes better and clings if you add after the dressing – along with salt and freshly cracked black pepper. Mix well, taste for seasoning, and it’s done.
The venison I harvest must remain a treat in my own kitchen, as various health codes prevent me from serving wild white-tailed deer, but there are other options should you not have a hunter in the family. Farm-raised venison is available at some specialty shops and online, usually red deer, rather than white-tailed, but the flavor is quite similar. If I were to prepare this dish with something other than venison, I’d likely opt for pork tenderloin or even high-quality chicken.
Before you begin, establish your mise en place complete and at ready. Your venison portioned and seasoned, vegetables all prepped, polenta cakes cut, and sauce finished with reserved sauce.
For four people, I’d want about 24 ounces, or a pound and a half of loin, divided into 4 equal portions. Clean the loin of sinew or silverskin and salt generously. Temperature, of course, is up to individual taste. Deer do not store any intramuscular fat, as opposed to domesticated animals like pork and beef. Whereas a good beefsteak remains fairly moist and tender through a range of cooking temperatures, venison will tend to get tougher at every sequential stage of cooking. I personally like my venison loin seared, finished quite quickly in a 350-degree oven. This is quite rare, but home cooks should cook to the temperature they are comfortable with, referring to a cooking temp chart and a thermometer for the correct internal temp.
Finishing the Dish:
First, begin bringing your sauce back to low temperature, proceeding slowly as high heat will break the cream. Preheat a saucepan to medium-high, add butter or oil to the pan, allow the fat to melt, then add your venison portions and sear on both sides until caramelized, about 3 minutes per side, turning once. Place in the oven and cook to desired temperature, remove loin from pan to rest, deglaze the pan with white wine, toss in the remaining chanterelles and allow wine to reduce to nearly dry. Set these aside.
Finish the vegetables and polenta as outlined below. Plating is an individual approach, but I would begin by slicing the well-rested venison – cutting before meat is well rested causes internal juices to dry, making for a drier, less tender experience. Place the warm polenta cake in the center of the plate, and then arrange the venison across it. Arrange the favas, corn, and squash on the plate around the polenta-venison ‘tower.’ Distribute the reheated chanterelles next, and then sauce the plate. I like a bit of sauce over the ingredients as well as on empty space. A sprinkle of sea salt over the meat, perhaps a few thyme leaves – bon appétit!
A nice treat for while you’re making a multi-course meal, too.
Ingredients
Scale
2 tbsp pure maple syrup
1 tsp light olive oil
1 tsp coriander
1/4 tsp salt
Pinch cayenne pepper
1 cup walnuts
Instructions
With a rack in the middle of your oven, preheat the oven to 325 degrees. Prepare a baking sheet by lining it with parchment paper or baking mat.
In a medium bowl, combine everything except the walnuts. Whisk together, then add the walnuts. Toss to coat well with the mixture.
Spread walnuts onto the baking sheet in one even single layer. (Works best on a nonstick surface or a silicon-baking sheet, such as a Silpat.
Bake in oven for 10 minutes, then stir and bake for approximately 10 minutes more until walnuts are golden brown. Remove from the oven and let cool completely on sheet.
Bring a sauce or sauté pan up to between medium and medium-high, add a tiny amount of butter then all the corn, beans, and squash. Let them warm up a bit then add about two ounces of stock.
Reduce until nearly dry, remove from heat, add a good tablespoon or so of whole butter and gently but thoroughly mix them together. This should result in a shiny, velvety sheen on the vegetables.
Sprinkle all with chopped thyme and season to taste, reserve for plating.
For the corn (2 ears):
Shuck and clean all corn silk from the ears. From here, it all depends on available equipment.
Slow roast, while constantly turning over an open gas burner to get good charred color and finish in a 350-degree oven for 5 minutes.
Roast on a home grill over medium to medium-high heat – this method should cook the corn completely.
For an oven, preheat at 450 degrees, lightly oil the corn, and then roast on a sheet tray, turning often. Once cool, clusters of corn can be cut from the ears, being careful to try to keep the clusters intact by cutting close to, but not into, the cob.
For the fava beans (1 1/12 lb in pods):
Have a pot of 1 ½ to 2 gallons of heavily salted water coming to a boil, along with a 2 qt container of ice bath and a strainer. Remove fava beans from the long, thick pods. When you have them all, throw them into the boiling water and allow cooking for 2 to 3 minutes.
Use your had strainer or spider to remove the favas and place directly in the ice water to stop them from cooking and cool for the next step. When cool, remove the inner fava bean from the outer casing. Set favas aside for final preparation.
For the baby summer squash (2 cups):
Clean, remove blossoms if intact, and split into bite-sized wedges, usually either quarters or halves.
Sauté with butter over medium-high heat until cooked through. Drain on paper towel and reserve.
The final cakes one cuts from the cooled polenta can be re-heated in a number of ways for plating; sautéed in a pan on the stovetop, or warmed in the oven. I often sauté on one side, flip them then put in the oven to heat through.
Ingredients
Scale
Butter to sauté the garlic
2 tbsp sliced wild garlic fresh bulbs
7 cups reduced-sodium chicken broth
2 cups quality stone-ground cornmeal
3 oz grated or micro-planed Parmesan
2 tbsp finely chopped English thyme
Salt (about 1 tsp) and freshly cracked black pepper, to taste
Instructions
In a large saucepan or Dutch oven, melt butter then sauté the sliced garlic until lightly golden.
Add the stock and a teaspoon of salt and bring to a simmer.
Whisk in the cornmeal and bring to a simmer.
Continue to cook at just-under-boiling temperatures, for 5 minutes or until the mixture is thickened. Be careful, polenta gets very hot and it can cause nasty burns if it gets on your skin!
Pull polenta off the heat, and then mix in the grated cheese and thyme. Season to taste.
Pour the polenta into well-greased flat-bottom dish in about a 1-inch layer (a Pyrex brownie pan is perfect), and cool for at least 2 hours. First hour out on a counter then finish in the refrigerator. This can, and actually should be made the day before, to allow the polenta to properly set and cool.
Once cool, you can either cut the pieces you want out of your pan for removal, or you can try to take all of the polenta out then cut shapes. I usually cut first then remove.
Real, gelatinous, homemade stock is one of those ingredients I simply cannot live without, professionally or at home. In both scenarios, I generally make chicken stock in large batches and reduce as needed. I would prefer entrée-specific stocks, but it simply isn’t always economical for time, space, and funds. I always reduce stock to varying degrees as soon as I’ve made it so that it doesn’t take up the entire freezer. The starting point of stock is already reduced from around a gallon of good stock down to a few cups. The texture of the chilled stock at that point is a few degrees thicker than Jell-O, or a (clean) finger pressed into it pushes through with some resistance.
Ingredients
Scale
3 medium shallots, sliced thin (1/3 to ½ cup)
Butter for sautéing
1 cup dried apricots, sliced thin
1 cup white wine (nearly anything works, but should not be a new oak-aged wine)
2 cups reduced stock
3 to 4 sprigs of thyme
1 bay leaf
1 lb of chanterelles, cleaned
¾ cup heavy cream
Instructions
In a saucepan preheated at medium heat, melt the butter then add the sliced shallots. Cook slowly over medium heat until they are soft and start to caramelize.
Add your sliced apricots and continue to cook together, until the apricots begin to disintegrate and the shallots are golden brown and caramelize. Stir often and be patient, this may take a while.
When this mixture is well caramelized, add your white wine, thyme, peppercorns and bay leaf. Let the wine reduce by half to two-thirds.
Add your stock and continue to reduce slowly until you reach sauce consistency, skimming as needed. Sauce consistency is met when a spoon dipped into the sauce holds its shape when removed. Remove thyme spring and bay leaf, set aside for the next steps.
In a separate sauté pan, preheat over medium-high heat. Add a knob of butter, let it melt then sauté your mushrooms, not overcrowding the pan. The mushrooms should reduce by about half in size. When finished, drain onto paper towels to soak up extra fat. This may take several rounds of sautéing, depending on the size of your pan. Overcrowding will lead to too much steam and an overly mushy chanterelle.
Add your heavy cream to the sauce base along with half of the chanterelles – reserving the other half for garnish- and slowly reduce, again, to sauce consistency. When it reaches sauce consistency, blend with blender or with an immersion blender. Strain and season.
Story and Recipe by Chef Tom Shuttlesworth Photography by Andrew Burkle Food Styling by Clare Vredevoogd Production by Burklehagen Shot on Location at Fallingwater thanks to the Western Pennsylvania Conservancy
Chef Tom Shuttlesworth knows a lot about what the Kaufmanns ate and drank. As the family that commissioned Fallingwater from revered American architect Frank Lloyd Wright, their preferences and tastes shaped life here. Preserved in anecdotes from Elsie Henderson, the Kaufmanns’ longtime cook, as well as in the archives of the Western Pennsylvania Conservancy, it’s clear that the family liked simple foods prepared with the best ingredients. While Chef Tom follows these lines, he adds his own family recipes, and layers in current day tastes.
Cocktails and Hors d’Oeuvres at Fallingwater
As part of his Forest to Table meal with TABLE Magazine, he shares an archival Hugo cocktail with TABLE readers. Accompanying this cocktail are small plates just right for a sunny autumn afternoon. Recipes for the sumptuous dinner Chef designed to follow this light starting point are here.
Salt-Roasted Fingerling Potatoes, Pickled Ramps, Footprints Farm Smoked Ham, Local Ricotta
This is a very easy appetizer: you can make as many or as few as you like. Before you begin, establish your mis en place. Cook and prepar potato halves. Slice the pickled ramps. Thinly slice the ham. Drain and season the ricotta.
Wash and dry as many potatoes as desired for your appetizers. You should be able to get two apps per potato. In a heatproof dish, pour in a level 1/2-inch layer of kosher salt. Place your potatoes on this layer of salt, and then completely cover them with at least another 1/2-inch of salt. Place dish in a preheated 350-degree oven and bake for approximately 30 minutes, or until cooked through as tested with a small paring knife or toothpick. Allow the potatoes to completely cool (they will cool quicker when removed from the salt). Once cool, the potatoes should first have small slices taken from opposing sides to create a level and stable ‘seating.’ Then split them in half. The halves should be lightly hollowed with a small melon baller.
Ricotta Potatoes:
A fresh, well-made ricotta should be rich, thick and not watery. If your ricotta appears to be thinner or have a lot of moisture, put a cup into a larger, doubled piece of cheesecloth, tie the cheesecloth off and allow to strain in colander until excess moisture is gone. This is best done the day before. Once your ricotta is in order, lightly season with salt, pepper, and the micro-planed zest of a half lemon.
The pickled ramp bulbs can be sliced and diced as desired. As much as I love it – and all cured hams! – refrain from using prosciutto or other air-dried hams and search out a good smoked ham. If you can’t find an American smoked ham, any number of Iberian or Black Forest hams (amongst many others) would fit the bill. The ham should be sliced as paper-thin as one can make it, which makes this often-two-bite appetizer easier to bite.
For assembly, line your potato halves on your work station, spoon in the ricotta filling, and just bulging over the halves, fold your ham into strips across the horizontal plane of the potato and top with sliced ramps.
Before you begin, establish your mise en place: Foie gras, individual pieces of the French cakes, preserves, gastrique, whole butter, and salt. Note: for foie gras, I used vacuum-packed, pre-cut slices that I thawed and split into hearty 1-ounce portions.
Preheat in a non-stick pan over medium heat. When the pan is to temp, melt in a tablespoon or so of butter, allowing the butter to melt, then add your French Cakes, keeping an eye on slowly caramelizing both sides to a lovely golden hue.
Preheat a sauté pan over medium-high heat, and make sure your exhaust fan is running! Salt both sides of your foie gras, then add to your dry, heated pan and sauté for about 30 seconds per side. Pull foie gras to a clean fold of towel and lightly dust with a good sea salt. High heat will create lots of smoke, but you are looking for a nice caramelized crust while essentially ‘warming’ the foie gras through. Cooking the foie gras beyond that point begins to render the foie gras, losing the texture, volume, and silken texture we’re looking for.
For Final Preparation and Plating:
For assembly: Start with the French cake as the base to which you add an appropriate amount of wild strawberry preserves; I like about a half to scant tablespoon. Place the hot foie gras on top of the jam, and spoon about a ½-teaspoon of black pepper gastrique on top.
Cream the brown sugar, sugar and butter for 3 to 4 minutes.
Add eggs one at a time, making sure the egg is well mixed before you add the next one.
Add vanilla.
Add the flour.
Chill in the fridge for 1 hour.
Heat waffle iron. Once waffle iron is hot, place 1 scoop of dough in the center of each square (mine makes 4 waffles, so it makes 4 cookies). You can use a cookie dough scooper for small cookies or an ice-cream scooper for a larger cookie; close waffle iron.
Let it cook for 1 1/2 minutes, for a small cookie or 2 minutes for large cookie.
Bring boiling-water canner, half-full with water, to simmer. Wash jars and screw bands in hot, soapy water; rinse with warm water. Pour boiling water over flat lids in saucepan off the heat. Let stand in hot water until ready to use. Drain well before filling.
Stem and crush strawberries thoroughly, one layer at a time. Measure exactly 4 cups crushed strawberries into 6- or 8-quart saucepot.
Add sugar; stir. Add butter to reduce foaming. Bring to full rolling boil (a boil that doesn’t stop bubbling when stirred) on high heat, stirring constantly. Stir in pectin. Return to full rolling boil and boil exactly 1 minute, stirring constantly. Remove from heat. Skim off any foam with metal spoon.
Ladle immediately into prepared jars, filling to within 1/4 inch of tops. Wipe jar rims and threads. Cover with two-piece lids. Screw bands tightly. Place jars on elevated rack in canner. Lower rack into canner. (Water must cover jars by 1 to 2 inches. Add boiling water, if necessary.) Cover; bring water to gentle boil. Process 10 minutes. Remove jars and place upright on towel to cool completely. After jars cool, check seals by pressing middle of lid with finger. (If lid springs back, lid is not sealed and refrigeration is necessary.)
This is a delightful, refreshing, and refreshingly low-alcohol aperitif that one can quaff all afternoon, before, during, and after a good repast, without alcohol overload. Simple and classic in flavor, one would think it a venerable standby, but it’s actually a recent invention that has taken Europe by storm. A simple mix of Prosecco – or your own favorite sparkling white – seltzer, elderflower syrup and a sprig of mint and lime to garnish. We usually mix glasses by eye at my house – you really can’t make a bad one.
Ingredients
Scale
2 parts Prosecco
1 part seltzer
1 to 2 tsp elderflower syrup
Sprig of mint
Lime, sliced thinly (optional)
Notes
I make my own elderflower syrup but it can be purchased at upscale or international food purveyors.
Story and Recipes by Chef Tom Shuttlesworth Photography by Andrew Burkle Food Styling by Clare Vredevoogd Production by Burklehagen Shot on Location at Fallingwater Thanks to the Western Pennsylvania Conservancy
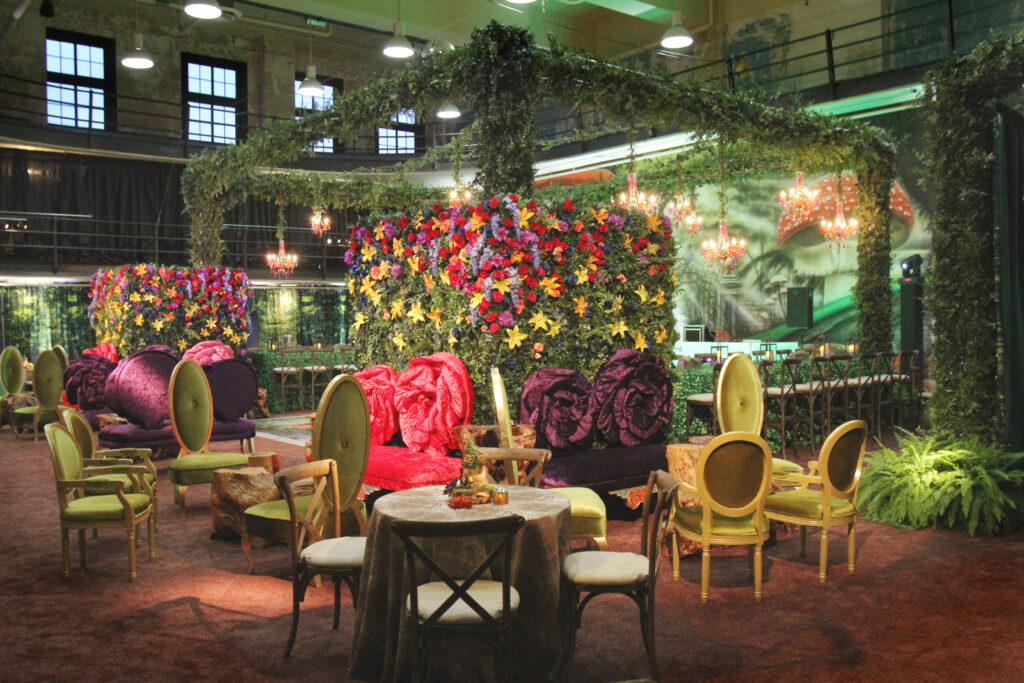
Anyone can throw a party. But to make a memory last, it takes a team of experts to weave the details into an experience for all the senses. This Bat Mitzvah showcases a unique approach to a colorful and enchanting fairy-inspired theme.
Planning an Enchanting Bat Mitzvah in Pittsburgh
Florist Nathan McCarthy of Hens and Chicks was inspired by enchantment that you could reach out and touch. The idea was a swoon-worthy bat mitzvah that could transport guests from reality. Furthermore, surroundings that gave guests the fantasy of living in a fairy tale book made the visuals come to life.
Upon arrival at the Ace Hotel, Event Planner Shari Zatman directed adults upstairs to the ballroom. The grand room held cocktails and a family-style dinner. The floors had been transformed in printed vinyl cobblestone, all while custom lighting gave that royal courtyard glow.
Magic in the Details of Bat Mitzvah Planning
Meanwhile, kids made a beeline into the gym area for carbonated beverages and munch-able finger foods. The atmosphere of the design gives an entranced scene that included walls draped with forest-patterned vinyl coverings and thick, green carpeting. The structure was expertly placed around a dance floor scattered with roses. The mood was energetic, immersive, fresh and unexpected.
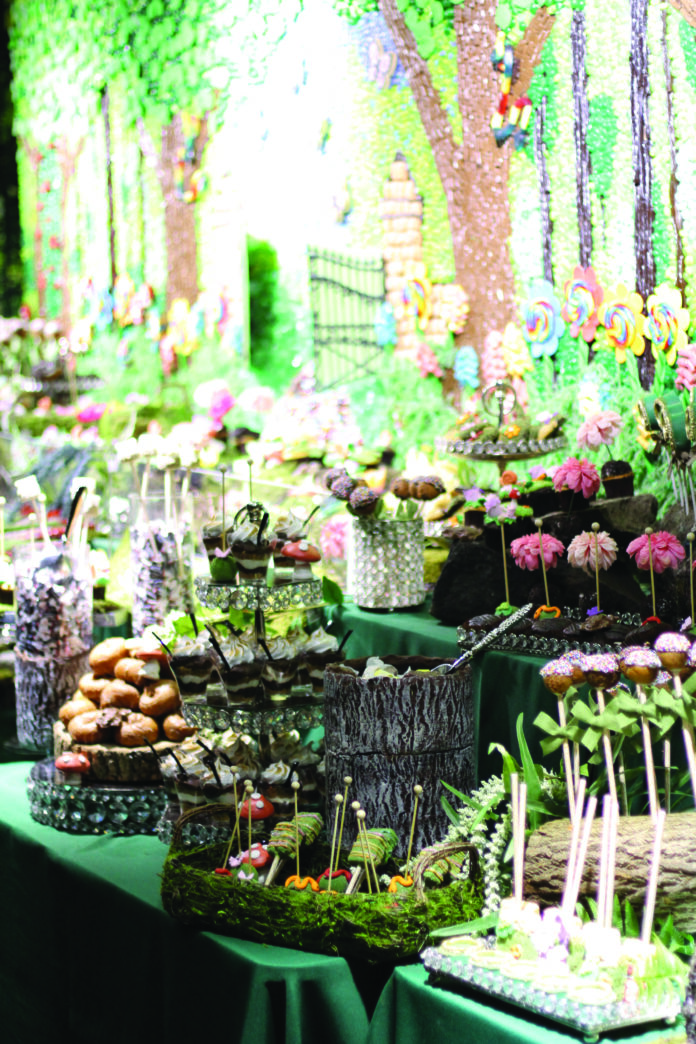
To captivate the senses even more, columns were cleverly designed as lush trees and bowers. Additionally, fairy performers floated around serving snacks. An equally witty and pretty dessert bar continued the theme.
All the while, spontaneous mini performances periodically erupted to add to the experience. While vibrantly colorful chandeliers hung, guests were dancing well into the night.
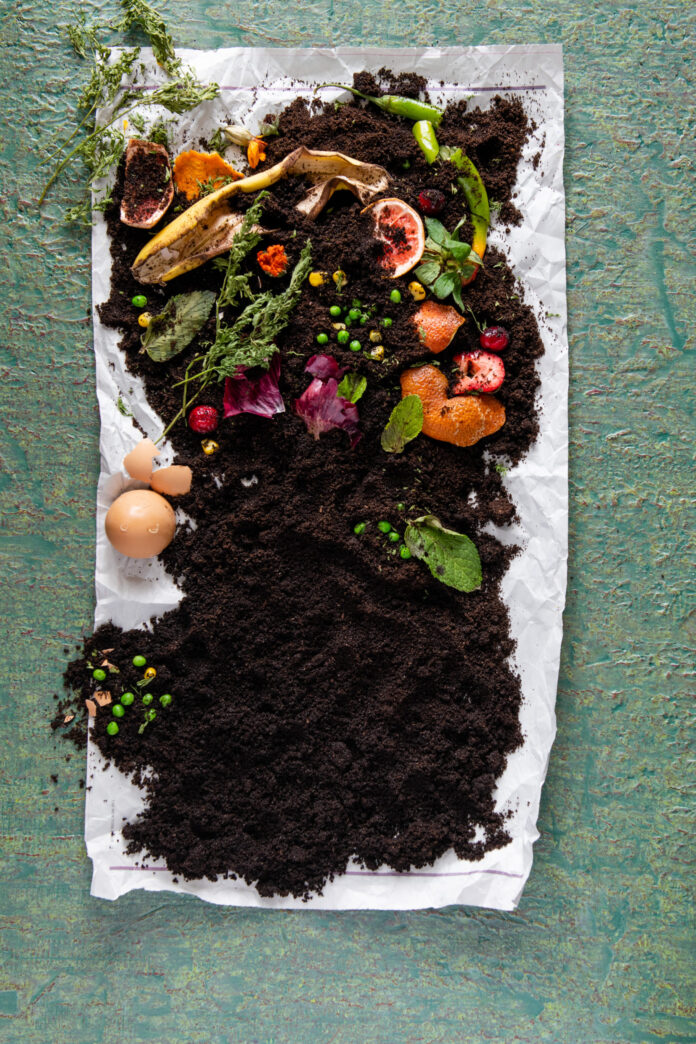
There’s a buzz of activity around my compost bin as a pair of wrens hunt insects for their newly hatched brood. Luckily, it’s the best place in the garden to sit. You can watch the spectacular show of the parents perching momentarily with their still-wriggling prey held tightly in their beaks.
As compost decomposes, it creates heat which in turn provides a comfy home for a host of bugs. The bugs crawl and fly around the outskirts, many helping in the decomposition process.
How to Start Composting at Home
Adding compost to the soil is what gives gardeners the proverbial “green thumb.” The soil amendment gives plants what they need to thrive, helps with balanced hydration and even helps reduce fungal issues.
Building the Perfect Pile
Anything that was once living will become compost. In the kitchen, things like eggshells, coffee grinds, fruit and vegetable scraps and unbleached paper towels can make their way to the compost pile. Additionally, avoid adding meats, dairy products, and oils because they attract rodents, but you can add disease-free plant material from the garden.
Use layers of green material from the garden and kitchen, alternating with brown material. This can include carbon-rich items like dried leaves and newspaper print. Together, they create the balance that makes the best compost. They can help you cut down on what you send to landfill.
Pick the Compost Systems That Work for You
There are many different systems for composting. I have three bins. I fill the first bin with fresh material. Furthermore, once it’s full, I start adding to number two, and by the time that fills up, number one is usually ready to harvest. While I use the finished compost from bin number one, I’ll start filling up number three.
Usually, it takes a year for a passive system like I am using for one bin to be ready. Using a garden fork to turn the pile over can speed up the process. If you turn rotating bins daily, you can make compost in just over a month.
Story by Doug Oster, Editor of Gardening With Doug Styling by Keith Recker Photography by Erin Kelly
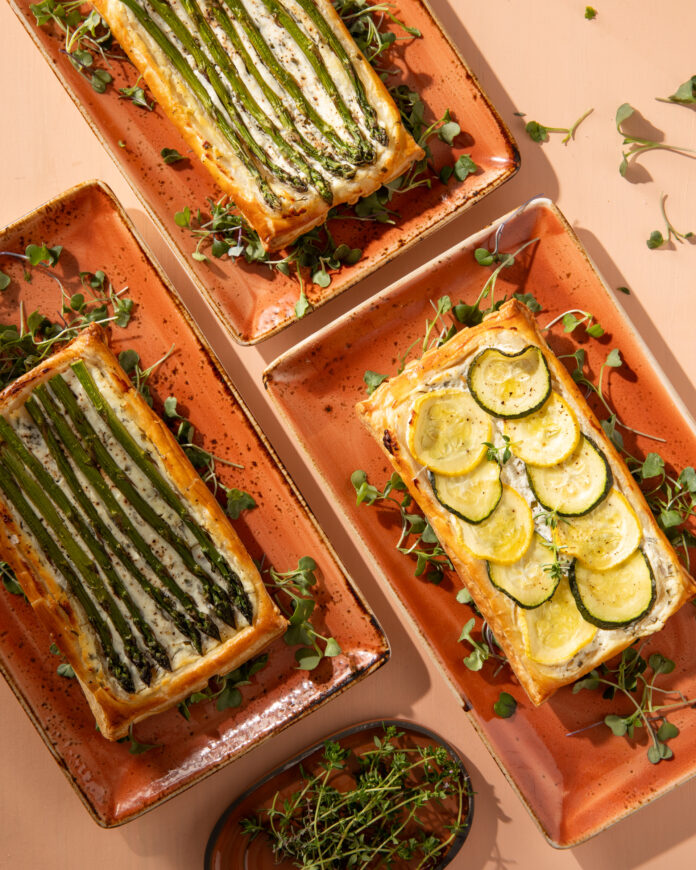
Puff pastry tarts are a blank canvas for creativity! Goat cheese and fresh herbs are such a great pairing for most summer vegetables that it’s easy to find inspiration from what’s in season at farm stands and farm markets. We went with always-abundant zucchini from Who Cooks for You Farm and some late-season asparagus, but please feel free to try any of your favorite veggies. We were also very generous with sprinkles of microgreens from Lettuce Ladies and cheese from Goat Rodeo.
What is a Herbed Goat Cheese?
Herbed goat cheese is a soft, tangy cheese made from goat’s milk and blended with a variety of fresh or dried herbs, such as thyme, rosemary, basil, chives, or dill. The creamy texture of the goat cheese pairs beautifully with the earthy, aromatic flavors of the herbs, creating a spreadable, flavorful cheese that’s both versatile and vibrant.
Thaw puff pastry sheet in fridge 2-3 hours before prepping dish
Preheat oven to 400 degrees.
Thinly slice zucchini, or other fresh vegetable, layer on cooling rack and lightly salt and let sit to extract water, approximately 30 minutes. Pat dry with paper towel
In a medium bowl, mix together goat cheese, ricotta, herbs, salt and pepper, mix well.
On a lightly floured surface, roll out sheet of puff pastry and cut into 6 equal rectangles. Place on parchment lined sheet tray. Keep cold in fridge until ready to use.
Using one puff pastry rectangle at a time, score a border around all 4 edges, dock middle of pastry with a fork to keep middle from puffing up while baking.
Spread herbed goat cheese mixture over center of puff pastry, add layer of sliced zucchini, add light drizzle of olive oil, fresh cracked pepper and flake salt.
Brush edge of puff pastry with egg wash.
Bake tarts for 15-17 minutes until golden brown. Let cool before serving.
Tip: The herbed goat cheese makes a great base for other vegetables in season; asparagus, stalks of Swiss chard, carrot ribbons, sliced radishes.
Recipe by Lauren Bohl White, Local Provisions Styling by Keith Recker Photography by Dave Bryce
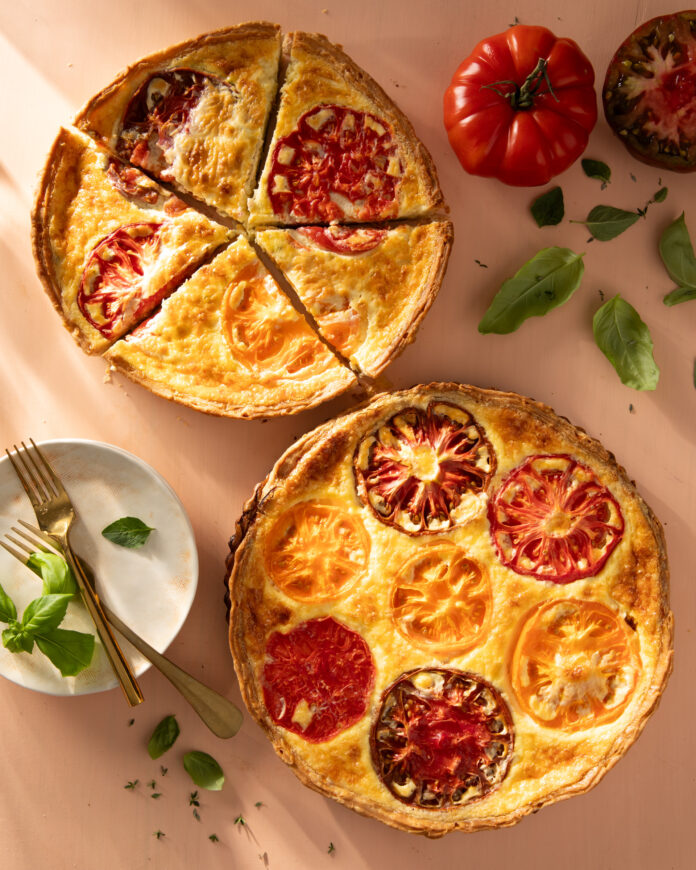
This is a tart that dreams are made of. If your dreams, that is, feature delicately roasted heirloom tomatoes atop a luscious savory custard. It’s worth the time and effort. At the bottom of the tips section of this recipe, I mention spreading a thin layer of pesto atop the baked tart crust. This adds a wonderfully different flavor to the tart. Leaving it out, though, lets the flavor of the tomatoes stand alone. Please go immediately to your favorite source of tomatoes … like multi-generation family business Trax Farms. And stock up on cheddar from Latrobe’s Pleasant Lane Farms.
What are Heirloom Tomatoes?
Heirloom tomatoes come from a wide range of varieties passed down through generations. Gardeners and chefs prize them for their rich flavors, vibrant colors, and wonderfully irregular shapes. Unlike commercial hybrids, heirloom tomatoes grow from open-pollinated seeds that naturally reproduce true to type. They come in a rainbow of hues like deep purples, bright yellows, greens, pinks, and multicolored stripes. Known for their superior taste and juicy texture, heirlooms are a favorite among home gardeners and chefs alike.
Make the crust a day ahead of time. This recipe will make two 8-10” crusts. Chilling time is 6-8 hours. The crust can be frozen for up to a few months.
Combine and whisk dry ingredients in a large bowl. Add in diced, cold butter. Use a pastry cutter to cut butter into flour until pea-sized crumbs.
Stir together cold water and vinegar and then add approximately half the liquid mixture into the dry. Mix together with spoon. Add in half the remaining liquid amount and mix until dough starts to form. If dough is dry, add in remaining liquid and bring dough together into a ball. Transfer dough to lightly floured surface and knead a few times until dough comes together.
Divide the dough evenly into two flattened disks. Wrap each disk in plastic wrap and refrigerate one at least 6-8 hours. The other disk can be frozen.
On a floured work surface, roll out dough to 12” round and approximately ¼” thick. Transfer dough to a 10” tart pan with a removable bottom. Trim top edge of dough ¼” above top edge of the tart pan. The dough will shrink during baking. and place in freezer for 1-2 hours until completely frozen.
Baking tart shell.Preheat the oven to 425 degrees. Line the tart shell with parchment paper that is larger than the tart and fill paper with dried beans or pie weights. Place tart on rimmed baking sheet, bake for 20 minutes, rotate pan and continue baking 15-20 minutes. Let cool with weights in place for 10 -15 minutes minimum. (The tart crust can be wrapped and stored at room temperature for 1-2 days.)
Prep tomatoes.While the tart shell is baking, slice the tomatoes to ¼” thick slices. Place slices in a single layer on a cooling rack with a rimmed sheet pan underneath. Gently salt tomatoes to leach out water. Let stand for 20 minutes. Flip tomatoes over and repeat adding salt, and stand for 20 minutes. If salt is a concern, wipe off excess salt before adding to tart.
Assembling tart.Reduce oven temperature to 350 degrees. Combine eggs, cream, mayo, salt and pepper. Whisk well to combine. (An immersion blender or blender can be used.) Add grated cheddar and shallots to the bottom of the tart crust. Pour egg mixture over, careful not to overflow the tart crust. Arrange tomatoes on top of custard and bake tart on parchment-lined rimmed baking sheet for 25 minutes. Rotate the pan and bake for another 20-25 minutes until set. Let cool completely. Serve at slightly warm or at room temperature.
Tips
There are many ways to make this tart your own by adding herbs, sauteed peppers or vegetables to the cheddar mix. My favorite addition is spreading a layer of pesto to the baked tart crust before adding the cheddar and custard.
Recipe by Lauren Bohl White, Local Provisions Styling by Keith Recker Photography by Dave Bryce