Home Blog Page 153

Hoppin’ Down the Bunny Trail with a Buzzed Bunny Mimosa

0
A tall glass holds a Hoppin’ Down the Bunny Trail with a Buzzed Bunny Mimosa in an orange color with a pineapple slice garnish as the whole glass sits beside a gold cocktail shaker.

Here comes Peter Cottontail, Hoppin’ Down the Bunny Trail with a Buzzed Bunny Mimosa. Count us in! Upon hearing that his assigned lyric involved hopping down the bunny trail, Square Café’s Steven Krall pulled his juicer onto the bar. Then, in it went fresh carrots, ginger, and pineapple. Out came the freshest, most flavorful blend of juices. (Don’t worry; for those who don’t juice, he also specifies store-bought juice equivalents in his recipe.) Then, he adds lime or lemon sparkling water and a healthy dose of prosecco –which we omit in the mocktail version. With or without alcohol, the resulting Buzzed Bunny Mimosa will have you just as bubbly and jazzed as a buzzed bunny. Enjoy!

Where Does this Easter Song Originate From?

The popular children’s song Peter Cottontail, which comes around during Easter time, was written by Steve Nelson and Jack Rollins in 1949. It gained widespread recognition when Gene Autry performed it that same year, solidifying its place as a seasonal classic which then became a TV special. The song’s cheerful melody and narrative about Peter Cottontail’s journey to deliver Easter eggs makes it a staple of holiday playlists as well as children’s entertainment for generations. This also makes it the perfect pick as the inspiration for our Buzzed Bunny Mimosa. We should note, the song’s origin is in the songwriting partnership of Nelson and Rollins, not in any pre-existing folk tradition or the Beatrix Potter stories like the Peter Rabbit counterpart.

Print
clock clock iconcutlery cutlery iconflag flag iconfolder folder iconinstagram instagram iconpinterest pinterest iconfacebook facebook iconprint print iconsquares squares iconheart heart iconheart solid heart solid icon
A tall glass holds a Hoppin’ Down the Bunny Trail with a Buzzed Bunny Mimosa in an orange color with a pineapple slice garnish as the whole glass sits beside a gold cocktail shaker.

Hoppin’ Down the Bunny Trail with a Buzzed Bunny Mimosa


  • Author: Steven Krall

Description

We promise this Buzzed Bunny Mimosa will have you smiling all Easter long.


Ingredients

Scale
  • 1 bottle Prosecco or Italian spumante
  • 6 pack of lemon-lime soda or lemon sparkling water
  • 12 oz pineapple/ginger/carrot/lemon juice (see below for fresh and store-bought options)

For the fresh juice:

  • 3/4 cup cut carrot sticks
  • 1 inch piece of fresh ginger root
  • 1 cup chopped pineapple
  • 1 lemon, rind off

For the store-bought juice:

  • 1 cup Dole Pineapple Juice
  • 5 oz V8® Carrot Ginger juice
  • 2 oz fresh squeezed lemon juice


Instructions

  1. Shake juices in a large shaker with ice.
  2. For the full-fledged mimosa: Pour approximately 6 oz of sparkling wine in glass (4 oz for flute). Slowly add approximately 4 oz of juice mixture (or to preference) at slight angle to avoid foam (2 oz for flute). Stir gently to combine. Garnish with pineapple skewer.
  3. For the mocktail: Fill a 12 oz highball glass with ice. Strain 4-5 oz chilled juice mix over ice. Top with approximately 3-4 oz of lemon-lime soda (or lemon seltzer for less sweetness). Garnish with lemon skewer or slice.

For the fresh juice:

  1. Using a juicer, process all ingredients into juice. Chill in refrigerator prior to use. Store any extra in a closed container for up to 3 days.

For the store-bought juice:

  1. Add juices to a pitcher and stir to combine. Chill in refrigerator prior to use. Store any excess juice in a closed container for up to 3 days.

Recipe by Square Café’s Steven Krall
Story by Star Laliberte
Styling by Anna Franklin
Photography by Laura Petrilla

Subscribe to TABLE Magazine’s print edition.

Here Comes Peter Cottontail Cocktail

0
A short wine glass with a Here Comes Peter Cottontail inside as a ball of cotton candy sits over the top of the glass. A golden bunny sits in the background by a pastel backdrop.

Start your Easter brunch off with Here Comes Peter Cottontail, a refreshing cocktail or mocktail bursting with bright notes of strawberry, lemongrass, and grapefruit. But the flavor experience doesn’t stop there. Vallozzi’s mixologists, Laura Karner and Stephanie Yarup, added more to the drink. “We immediately wanted to make a fun cotton candy cocktail when we heard our assigned line was ‘Here Comes Peter Cottontail.’ To welcome spring, we wanted a bright sangria with plenty of fruit and botanicals.” They complete their drink with pure fun: a puff of cotton candy garnish goes in the glass before you pour the cocktail. Plus, you can be just as fancy with your mocktail if that’s what you prefer.

What is Domaine de Canton in This Cocktail?

Domaine de Canton is the original ginger liqueur using only the finest ingredients. To start, the company farms ginger from Asia before hand-cutting it, rinsing it, and letting it dry for several days after. From here, hand-picked vanilla beans and honey stir into the recipe for a little bit of sweetness to balance out the sharp burst of ginger.

Print
clock clock iconcutlery cutlery iconflag flag iconfolder folder iconinstagram instagram iconpinterest pinterest iconfacebook facebook iconprint print iconsquares squares iconheart heart iconheart solid heart solid icon
A short wine glass with a Here Comes Peter Cottontail inside as a ball of cotton candy sits over the top of the glass. A golden bunny sits in the background by a pastel backdrop.

Here Comes Peter Cottontail Cocktail


  • Author: Laura Karner and Stephanie Yarup

Description

A mocktail or cocktail recipe to celebrate Easter!


Ingredients

Scale

For the cocktail:

For the mocktail:

  • 4 oz strawberry lemonade
  • 1 oz grapefruit juice
  • Splash of ginger ale
  • Cotton candy
  • Strawberries


Instructions

  1. Shake all of the liquid ingredients with ice.
  2. Fill a wine glass with cotton candy (about .3 oz).
  3. Pour the drink over the cotton candy.
  4. Garnish with sliced strawberries.

Recipe by Vallozzi’s Mixologists, Laura Karner and Stephanie Yarup
Story by Star Laliberte
Styling by Anna Franklin
Photography by Laura Petrilla

Subscribe to TABLE Magazine’s print edition.

Vegetarian Pasta au Gratin

0
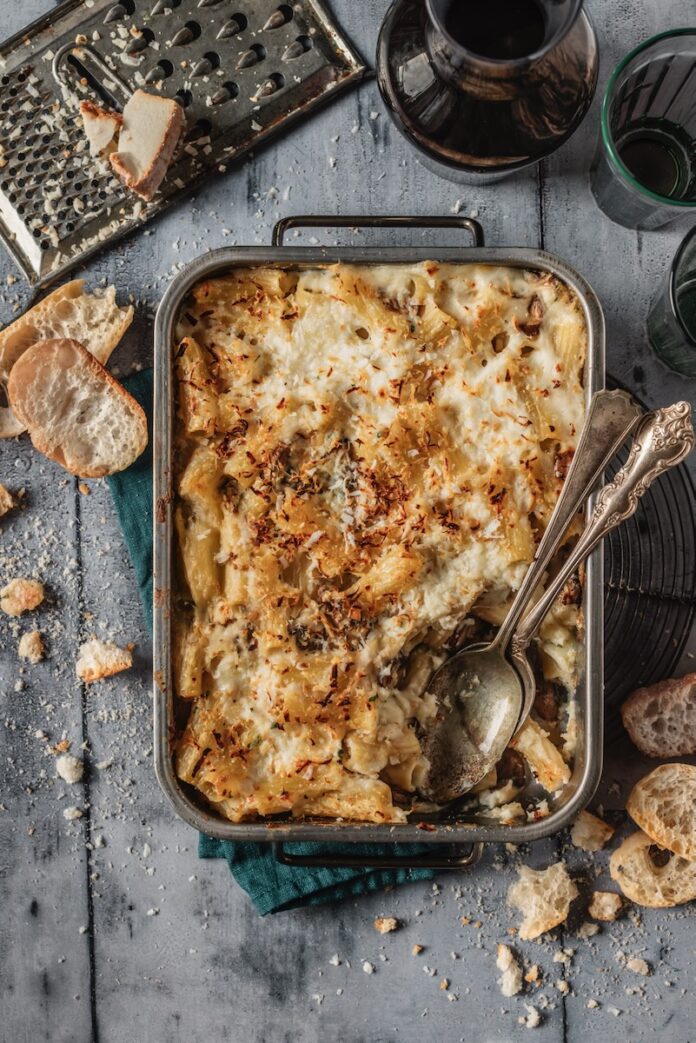
A baking dish with crusty bread sitting around it on a grey table holds a Pasta au Gratin with a spoon scooping out the bottom right corner.

Baked Vegetarian Pasta au Gratin is one of the most popular dishes for Sunday family gatherings in Italy, second only to lasagna. It is rich and flavorful and can be made with a wide range of ingredients. Variations include the addition of prosciutto or a tomato-based version with meatballs and boiled eggs. In our recipe we make a vegetarian version that uses plenty of cheese, mushrooms, and a béchamel sauce. It can be assembled the day before and baked in the oven just before your lunch. It’s appropriate both for holiday dinners and for more casual meals, and everyone loves it.

What is Pasta au Gratin?

If you know of potatoes au gratin, Pasta au Gratin is not that far off. Au gratin here simply means sprinkling on breadcrumbs and grated cheese, and broiling it in the oven until the dish is creamy, crispy, and cheesy all at once. You really want to let the cheese brown on top while baking in the oven. It’s what adds that interesting textural component and gives you an irresistible cheese pull.

A hollow pasta like penne or rigatoni works best for this traditional dish. Why? They allow the flavors of béchamel sauce and Italian cheeses to penetrate deeply into the pasta.

Print
clock clock iconcutlery cutlery iconflag flag iconfolder folder iconinstagram instagram iconpinterest pinterest iconfacebook facebook iconprint print iconsquares squares iconheart heart iconheart solid heart solid icon
A baking dish with crusty bread sitting around it on a grey table holds a Pasta au Gratin with a spoon scooping out the bottom right corner.

Vegetarian Pasta au Gratin


  • Author: Sara Ghedina
  • Yield: 6 Servings 1x

Description

We promise you the more cheese the better for this recipe.


Ingredients

Scale

For the pasta: 

  • 1 lb dried pasta such as penne or rigatoni
  • 1/2 lb fresh mozzarella (approx.), cut in cubes
  • 1/2 lb smoked scamorza (approx.), cut in cubes
  • 1 lb champignon or button mushrooms
  • 2 –3 tbsp extra virgin olive oil
  • 2 garlic cloves
  • 2 tbsp minced fresh parsley
  • 2–3 tbsp butter
  • 3–4 tbsp grated Parmesan cheese
  • Salt and pepper to taste

For the béchamel sauce:

  • 3 and 1/3 cup whole milk
  • 6 tbsp butter
  • 2/3 cup all-purpose flour
  • 1/4 tsp nutmeg
  • Salt and pepper to taste


Instructions

  1. First, make the béchamel sauce. Melt the butter in a large saucepan over low heat.
  2. Sift the flour and add it to the butter, mixing it with a wooden spoon until you get a thick and smooth paste (roux). Let the mixture cook for 1 minute, stirring frequently to prevent it from sticking to the pan and burning.
  3. Meanwhile, heat the milk in a different pot without bringing it to boil. It should be lukewarm.
  4. Take the roux off the heat and add the milk, whisking vigorously to break any lumps.
  5. Place the béchamel back on the stove. Season with nutmeg, salt, and pepper and cook it for about 6 or 7 minutes, stirring frequently, until you get the right consistency. Set aside.
  6. Clean the mushrooms and slice the ends off the stems.
  7. Slice the cleaned mushrooms.
  8. Heat the olive oil in a pan, add the garlic cloves, and lightly crush them with a spoon to release their flavor. Cook for 2 minutes.
  9. Add the sliced mushrooms, season with salt and pepper, and sauté until tender and the liquid they release cooks away. About 10 minutes.
  10. Remove the garlic cloves and add minced parsley, stir to combine. Remove from the heat.
  11. Meanwhile, cook pasta in salted boiling water, but keep it very al dente, about 3 or 4 minutes less than the recommended cooking time. Drain and mix it with the sautéed mushrooms and half of the béchamel sauce.
  12. Grease an oven-safe baking dish with 1 tbsp butter, cover the bottom with a thin layer of béchamel sauce, add half of the cooked pasta, distribute half of the cheeses on top and cover with another thin layer of béchamel sauce. Repeat.
  13. Scatter 2 tbsp butter on top and generously sprinkle with Parmesan cheese.
  14. Bake in the oven at 375° for 30 minutes, until the surface turns golden brown. Let rest for few minutes before serving.

Recipe, Story, Styling, and Photography by Sara Ghedina

Subscribe to TABLE Magazine’s print edition.
Scarpaccia (Italian Zucchini Tart)

0
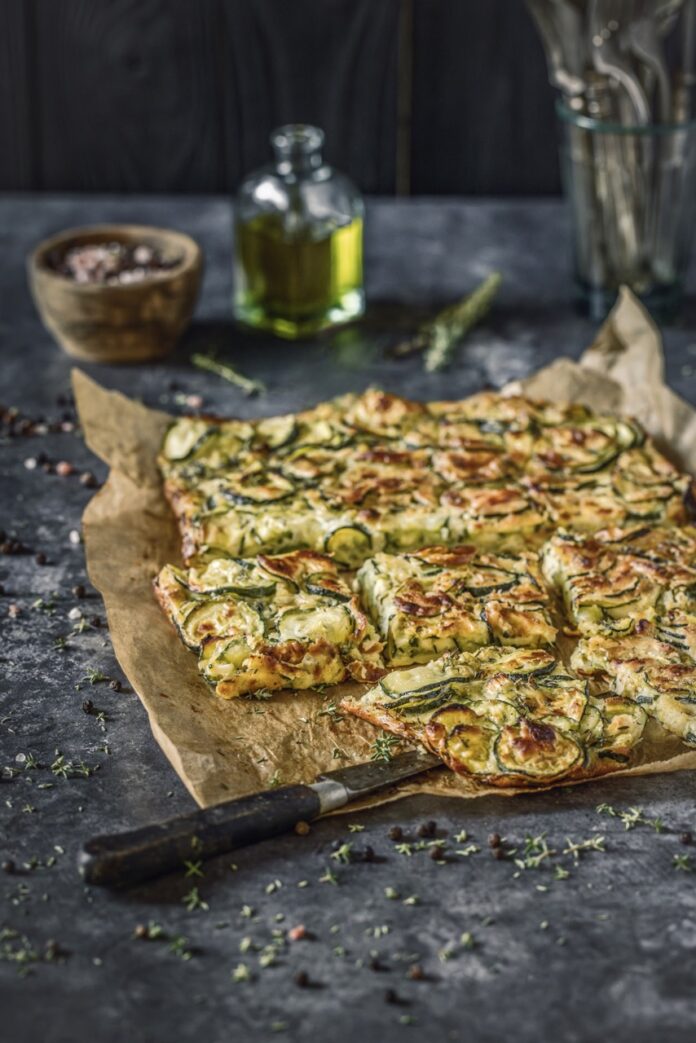
A piece of parchment paper sits on a counter top with square slices of Italian Scarpaccia scattered on the paper.

Scarpaccia is a typical dish from Camaiore, a small town in the province of Lucca, Tuscany. Part of the traditional cuisine of the area, it was originally made by bread bakers at the end of the day when the oven had been turned off but was still warm. There are many variations of scarpaccia: some use onions or leeks instead of green onions, some add eggs to the batter, and some add zucchini blossoms on top. Either way, remember that the suggested ingredient quantities are only an imprecise starting point, because it all depends on how much water the zucchini will release and on the type of flour you use. For a perfect result, trust your instinct and eyeball everything, just like my grandmother used to do.

What Exactly is Scarpaccia Anyways?

Scarpaccia is a rustic Italian dish that’s great on a budget. It is basically a savory or sweet tart (or flatbread, depending on how you look at it). In its savory form, it often features zucchini as the star ingredient along with eggs, flour, and herbs, resulting in a simple yet flavorful crisp. However, there are also sweet versions, particularly common in Tuscany. These resemble a thin cake or pancake and uses anise or other sweet spices. Either way, the end product is a thin, crunchy, chewy sheet layered with your favorite vegetables or sweet spices on top.

Print
clock clock iconcutlery cutlery iconflag flag iconfolder folder iconinstagram instagram iconpinterest pinterest iconfacebook facebook iconprint print iconsquares squares iconheart heart iconheart solid heart solid icon
A piece of parchment paper sits on a counter top with square slices of Italian Scarpaccia scattered on the paper.

Scarpaccia (Italian Zucchini Tart)


  • Author: Sara Ghedina
  • Yield: Serves 5

Description

Thin, crunchy, and layered in zucchini slices.


Ingredients

Scale
  • 2 lb zucchini
  • 6–8 zucchini blossoms (optional)
  • 3–4 spring onions
  • 3/4 cup all-purpose flour
  • 1/2 cup + 1 tbsp chickpea flour
  • 1 cup water or more if needed
  • 6 tbsp olive oil, plus extra to grease the pan
  • 1–2 tbsp corn flour (polenta)
  • 4–5 sprigs fresh thyme or other herbs
  • Salt and pepper to taste


Instructions

  1. Slice zucchini and spring onions really thin (for the green onions, use the white and light part only), place them in a large bowl and sprinkle with salt and pepper. Gently mix them by hand, cover with a plate, and place a weight on top. Let sit in the fridge for at least three hours to allow the vegetables to release their water.
  2. Drain and set aside, reserving the liquid. Combine the two flours and add them to the zucchini water, add 4 tbsp olive oil and stir well, adding more water as needed until you have a smooth and runny batter.
  3. Season it with salt, pepper and fresh thyme (or other herbs), and mix well until there are no lumps. Add back the sliced vegetables and mix well.
  4. If you have them, remove and discard the pistil from the zucchini blossoms, cut them in stripes and set aside.
  5. Generously grease a baking tray or roasting pan with olive oil the bottom, pour the batter in, and level it with a spatula. It should be about 1/2 inch thick.
  6. Scatted the zucchini blossom strips (optional) on top. Sprinkle the scarpaccia with 1-2 tbsp corn flour for extra crispiness. Drizzle with 2 tbsp olive oil. Bake at 400° for 30-40 minutes until the scarpaccia is golden brown and crispy on top.
  7. Cut it in squares and serve warm as an appetizer or a light meal along with a side salad and a glass of Verdicchio wine.

Recipe, Story, Styling, and Photography by Sara Ghedina

Subscribe to TABLE Magazine’s print edition.
Ricotta Vegetarian Meatballs

0
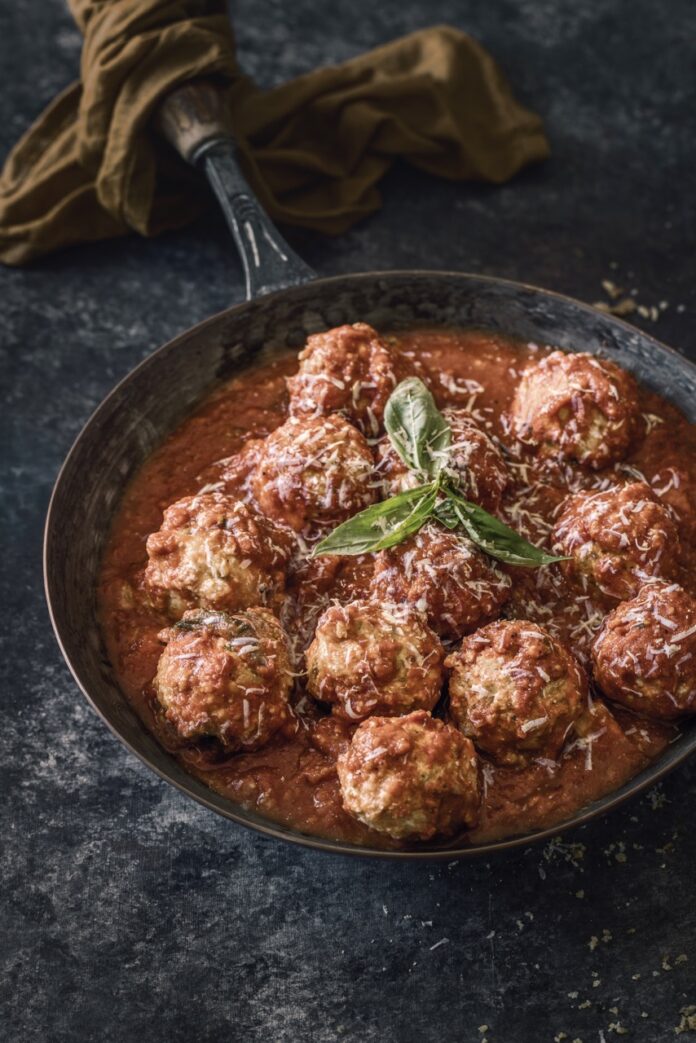
A bunch of ricotta vegetarian meatballs sit in a cast iron pan, soaked in re sauce with basil garnish on top as the pan is surrounded by pasta, a bowl of the meatballs, and bread.

Ricotta Vegetarian “Meatballs” seem to have originated in the Southern region of Calabria, where it is very easy to find excellent ricotta from both cows and sheep. This dish is part of traditional peasant cuisine; it is made with very simple ingredients but with lots of flavor. For excellent results, use the best, freshest ricotta cheese you can find. After you make these meatballs and their matching homemade tomato sauce, throw in your favorite pasta and then congratulate yourself on a thoughtful dinner.

What Replaces the Meat in These Vegetarian Meatballs?

We know what you’re thinking. How on Earth can you make a meatball without the main ingredient? Believe it or not our Vegetarian Meatballs use the ingredient of ricotta to make these delectable bites. The combination of ricotta cheese along with stale bread, eggs, and parmesan cheese makes a dough that you can form into balls. After formation, you can cook this dough in a pan along with the homemade tomato sauce. The end product actually ends up looking a lot like regular meatballs. The taste complements any dish it’s served alongside. Perhaps you’ll take an adventure with Stanley Tucci and prepare a sauce inspired by his Maria Rosa Tomato Sauce.

Print
clock clock iconcutlery cutlery iconflag flag iconfolder folder iconinstagram instagram iconpinterest pinterest iconfacebook facebook iconprint print iconsquares squares iconheart heart iconheart solid heart solid icon
A bunch of ricotta vegetarian meatballs sit in a cast iron pan, soaked in re sauce with basil garnish on top as the pan is surrounded by pasta, a bowl of the meatballs, and bread.

Ricotta Vegetarian Meatballs


  • Author: Sara Ghedina

Description

Vegetarian meatballs are just as good as the real thing.


Ingredients

Scale

For the “meatballs”: 

  • 1 and 3/4 cup ricotta cheese
  • 4 cups stale bread, crust removed, cut in chunks
  • 2 medium eggs
  • 1 garlic clove
  • 1 tbsp minced parsley
  • 2–3 tbsp freshly grated Parmesan cheese
  • Salt and pepper to taste

For the tomato sauce: 

  • 2 cans whole peeled tomatoes
  • 2 tbsp olive oil
  • 2–3 garlic cloves
  • 3–4 fresh basil leaves
  • Salt and pepper to taste


Instructions

  1. Strain ricotta overnight to remove excess liquid.
  2. The next day, place it in a large bowl along with bread, minced garlic, parsley and Parmesan cheese.
  3. Lightly beat the eggs with a fork and add them to the mixture.
  4. Season with salt and pepper, and mix well until everything is incorporated and you get a smooth and lightly sticky dough. If the mixture is too wet, add a bit of breadcrumbs or flour.
  5. Take some of the dough and, using your hands, form 2-inch balls, a little larger than the size of a golf ball. Lightly roll them in your palm to smooth them out a little. You should get around 14-16 of them.
  6. Place the “meatballs” on a tray dusted with flour while you make the sauce.
  7. In a large pan, heat the olive oil with the peeled garlic cloves and gently crush them with a spoon to release the flavor.
  8. Cook for 2-3 minutes, then, using a food mill, purée the canned tomatoes and pour them into the pan.
  9. Season with salt and pepper, remove the garlic cloves and add the basil leaves.
  10. Bring the sauce to simmer and cook it on low heat for few minutes, then gently add the ricotta balls, distributing them evenly in the pan. Cover with a lid and cook for about 10 minutes.
  11. Serve the ricotta balls while hot, with plenty of sauce on top. Make sure to have lots of bread available to scoop up the sauce!

Recipe, Story, Styling, and Photography by Sara Ghedina

Subscribe to TABLE Magazine’s print edition.
Potato and Sweet Pea Gnocchi

0
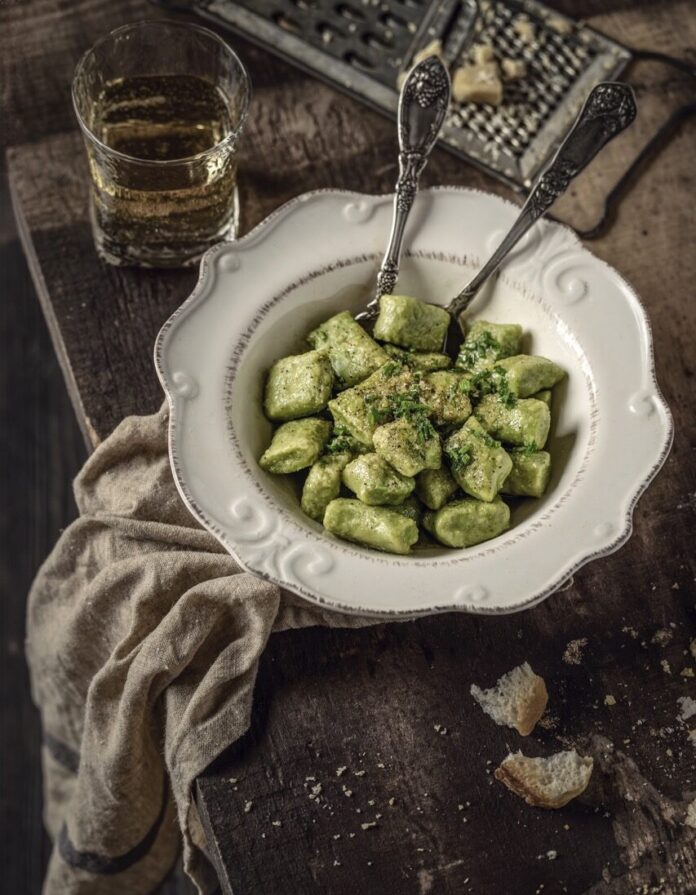
A white bowl holds Potato and Pea Gnocchi in a green color with two forks sitting beside the bowl and bread sitting above it.

This Potato and Sweet Pea Gnocchi recipe is a riff on classic gnocchi, with green peas added to the dough for a touch of color and a sweeter taste. The ingredients are simple and inexpensive, but the result is spectacular. These gnocchi are very versatile, and they pair well with any type of sauce, tomato or cream based, but I chose to dress them in the simplest way, using the classic combination of melted butter and grated Parmesan. Everyone will love this dish, both for the taste and for the color!

Tips for Making Potato Gnocchi From Scratch

Making homemade pasta may see like a difficult task but as long as you stick to the recipe and use these tips, your Potato and Sweet Pea Gnocchi will have delicious results. For successful homemade potato gnocchi, you want to prioritize using starchy potatoes. We also recommend cooking them whole to avoid excess moisture. Rice the potatoes through a potato ricer while they’re still warm for a smooth texture before incorporating flour sparingly to prevent a dense, tough result. You want to be careful to handle the dough gently, avoiding overworking it. When it finally comes time to cook your gnocchi, remove them as soon as they float in the boiling water and toss immediately with sauce to prevent sticking.

Print
clock clock iconcutlery cutlery iconflag flag iconfolder folder iconinstagram instagram iconpinterest pinterest iconfacebook facebook iconprint print iconsquares squares iconheart heart iconheart solid heart solid icon
A white bowl holds Potato and Pea Gnocchi in a green color with two forks sitting beside the bowl and bread sitting above it.

Potato and Sweet Pea Gnocchi


  • Author: Sara Ghedina
  • Yield: Serves 6

Description

Become a homemade pasta expert with this easy gnocchi recipe.


Ingredients

Scale
  • 2 lb russet potato
  • 1 lb frozen sweet peas
  • 2 scallions
  • 1 tbsp extra virgin olive oil
  • 1 medium egg
  • 2 cups all-purpose flour (approx)
  • Salt and pepper to taste
  • 3–5 tbsp butter
  • Parmesan cheese to serve, as needed


Instructions

  1. Preheat the oven to 400°.
  2. Lightly oil the outside of the potatoes. Prick them a few times with a fork. Sprinkle with salt. Place them on a lined baking sheet and bake until tender, 45 minutes to 1 hour.
  3. While potatoes are baking, heat the olive oil in a pan, add the sliced scallions (white and light parts only), and cook for few minutes until they soften and become translucent.
  4. Add the frozen peas, season with salt and pepper and cook at medium heat until the peas are tender. If needed, add a few tbsp of water to prevent the peas from sticking to the pan.
  5. Place them in a blender and blend on high speed until the mixture is completely smooth, adding a bit more water if needed. Set aside.
  6. Remove the potatoes from the oven. While still hot, peel them and pass them through a potato ricer.
  7. Place riced potatoes in a large bowl and form a well in the center. Add the pea puree and the egg, and season with salt and pepper. Whisk it all together with a fork.
  8. Add the flour, slowly mixing it in until fully incorporated. The amount of flour will vary depending on the potatoes; you may need more or less than 2/3 cup.
  9. Place the dough on a flour-dusted board and knead it a few times. Cover it with a damp cloth to prevent it from drying out. Working with a small portion of dough at a time, roll it into a log about ¾” thick and cut out the gnocchi using a sharp knife.
  10. Place gnocchi on a baking tray or a large plate dusted with flour.
  11. Meanwhile, bring a large pot of salted water to a boil and melt the butter in a large skillet over medium-high.
  12. Add gnocchi to the boiling water and cook until they rise to surface, about 2 to 3 minutes. Using a slotted spoon, transfer cooked gnocchi to the skillet with the melted butter, adding 2-3 tbsp of their cooking water to get a creamier sauce.
  13. Cook for about 1 minute, then transfer the gnocchi to individual serving bowls and generously sprinkle them with freshly grated Parmesan cheese. You may need to cook gnocchi in few batches, repeating the process for the sauce.

Recipe, Story, Styling, and Photography by Sara Ghedina

Subscribe to TABLE Magazine’s print edition.
Pasta e Ceci (Pasta with Chickpeas)

0
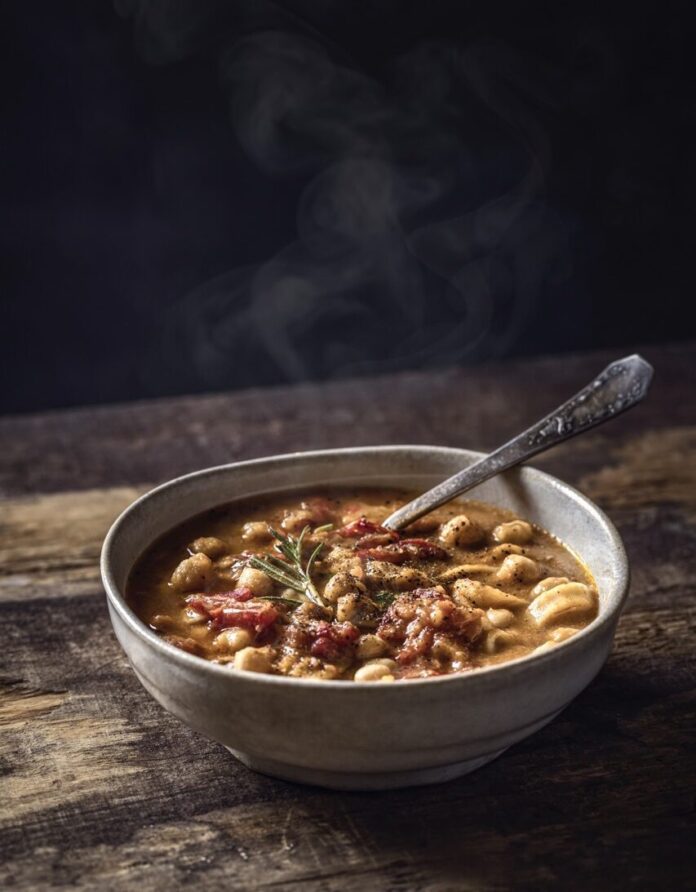
A grey bowl of Pasta e Ceci sits on a black table with pieces of bread and pasta scattered around the bowl.

Pasta e Ceci is a popular dish in many regions of Central and Southern Italy. The name simply translates to pasta with chickpeas. As with many other traditional recipes, there are countless variations, and almost every family has their own. The version I suggest here is characterized by the use of broken fettuccine (or other egg pasta such as tagliatelle), and the aroma of rosemary and extra virgin olive oil. You’ll also commonly find this recipe in many areas of Tuscany.

What’s the History of Pasta e Ceci?

Pasta e Ceci with its humble recipe has a humble history as well in the cucina povera, or “poor kitchen,” traditions of Italy. Its origins trace back to ancient Roman times where chickpeas were a staple food. Because this ingredient was readily available and inexpensive, recipes using chickpeas became a must for the Romans. Over centuries this simple combination of pasta and chickpeas kept evolving. Now it’s seen as a comforting and nourishing meal. Along with its popularity, regional variations came about with some areas adding tomatoes, garlic, or rosemary. Some regions also thickened the broth with a soffritto or a roux to make something like a stew.

Print
clock clock iconcutlery cutlery iconflag flag iconfolder folder iconinstagram instagram iconpinterest pinterest iconfacebook facebook iconprint print iconsquares squares iconheart heart iconheart solid heart solid icon
A grey bowl of Pasta e Ceci sits on a black table with pieces of bread and pasta scattered around the bowl.

Pasta e Ceci (Pasta with Chickpeas)


  • Author: Sara Ghedina
  • Yield: Serves 4

Description

The addition of chickpeas bulks up this pasta dish for a filling dinner.


Ingredients

Scale
  • 1/2 lb dried chickpeas
  • 2–3 garlic cloves
  • 2 tbsp extra virgin olive oil
  • 2 1/2 cups canned peeled cherry tomatoes
  • 2 rosemary sprigs
  • 1/4 tsp chili flakes (optional)
  • 5 oz egg fettuccine (you can use eggless pasta for a vegan version)
  • Salt and pepper to taste


Instructions

  1. Place the dried chickpeas in a bowl and cover with water. Let sit overnight to soften.
  2. The next day, drain and rinse them thoroughly, then place in a large pot with about 2 qt of water. Add a pinch of salt, cover with a lid, and cook at low heat until chickpeas are tender. It will take 2 to 3 hours. Stir from time to time and discard the foam if necessary.
  3. About halfway through the cooking time, remove 2 cups of chickpeas with a little bit of their cooking water and purée them with a blender. Place the mixture back in the pot and continue cooking.
  4. Meanwhile, heat 2 tbsp olive oil in a pan, add garlic cloves, rosemary sprigs and chili flakes if using. Sauté for 3 minutes, then add the canned cherry tomatoes. Gently crush them with a spoon, stir and cook at medium heat for about 10 minutes.
  5. Now discard the garlic cloves and pour the olive oil mixture into the pot with the chickpeas.
  6. Stir, add salt and pepper if needed, and continue cooking at low heat until chickpeas are tender.
  7. Break the dried fettuccine and place in the pot with the chickpea soup. Cook according to package instructions.
  8. Serve Pasta e Ceci in individual bowls, with a drizzle of olive oil and some grated Parmesan cheese on top.

Recipe, Story, Styling, and Photography by Sara Ghedina

Subscribe to TABLE Magazine’s print edition.
Rhubarb Frangipane Tart

0
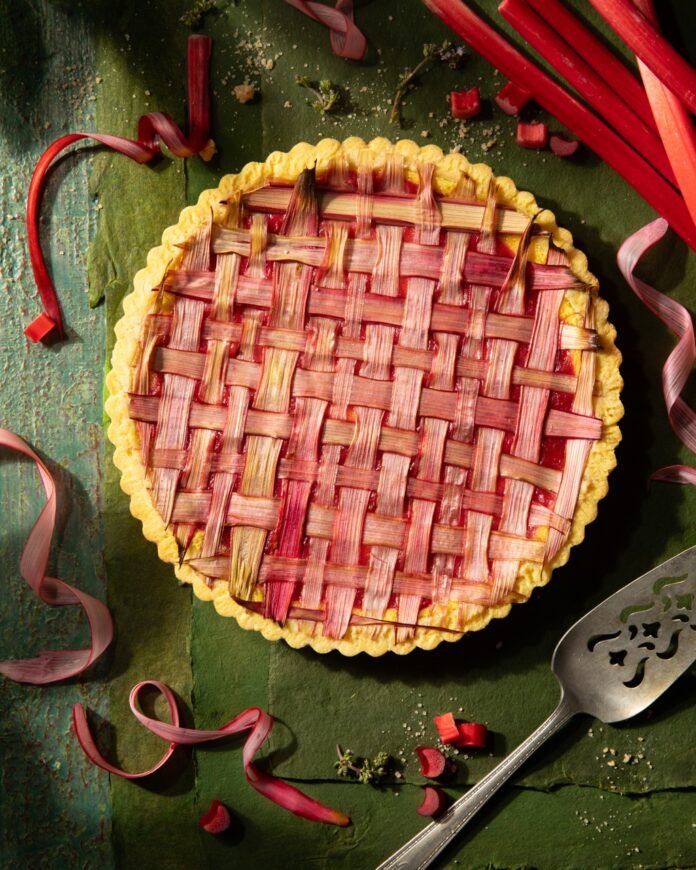
A Rhubarb Frangipane Tart with a slice taken out of it featuring latticed rhubarb on top and around the tart on the green table.

Don’t let the photo scare you: you DO NOT have to weave your rhubarb slices to enjoy this Rhubarb Frangipane Tart. You could lay them on top of the delicious almond-based frangipane filling any-which-way and the flavor would be just as delicious. If you’re brave, however, and willing to spend a little time slicing stems of rhubarb on a mandoline, it is much easier than it looks. We promise. Head to your local farmer’s market to pick up rhubarb and you can even look for locally made flour as well. In both cases, fresh and local flavors add to the impact on the tastebuds.

What is Frangipane?

Frangipane is a sweet custard cream which uses almonds. It’s a base for various pastries and desserts. This blend of butter, sugar, eggs, and ground almonds creates a rich but also dense filling with a moist, slightly chewy texture. Due to its texture, frangipane usually maintains its shape during baking, making it ideal for tarts, cakes, and pastries. Especially in the case of our Rhubarb Frangipane Tart, it adds a distinctive nutty flavor and smooth consistency that takes this recipe over the top.

Print
clock clock iconcutlery cutlery iconflag flag iconfolder folder iconinstagram instagram iconpinterest pinterest iconfacebook facebook iconprint print iconsquares squares iconheart heart iconheart solid heart solid icon
A Rhubarb Frangipane Tart with a slice taken out of it featuring latticed rhubarb on top and around the tart on the green table.

Rhubarb Frangipane Tart


  • Author: Anna Franklin

Description

A tart that takes inspiration from the flourishing produce at farmer’s markets.


Ingredients

Scale

For the crust: 

  • 4 1/2 oz butter, softened
  • 3 oz confectioner’s sugar
  • 2 egg yolks
  • 1 tbsp heavy cream
  • 2 tsp vanilla extract
  • 1/4 tsp Kosher salt
  • 8 oz all-purpose flour

For the frangipane filling: 

  • 2 1/2 oz ground almonds
  • 1 1/2 oz confectioner’s sugar
  • 1/4 tsp Kosher salt
  • 1 3/4 oz butter, softened
  • 1 egg yolk
  • 2 oz heavy cream

For the rhubarb topping: 

  • 2 cups rhubarb jam
  • 30 thinly sliced pieces of rhubarb


Instructions

  1. In a stand mixer with the paddle attachment, beat the butter and sugar together at medium speed until creamy, 2 minutes. Add the egg yolks, cream, vanilla and salt, and beat for another minute at medium speed.
  2. Add flour and mix on low until just incorporated. Make into a dough with your hands.
  3. Lightly press the tart dough into your tart pan.
  4. Use your hand and fingers to press it around and up the sides of the pan. Make sure to get the dough the same thickness all over. Place tart pan on a baking sheet and freeze for about 20-30 minutes.
  5. For the filling, in a stand mixer with the paddle attachment, beat the ground almonds, sugar, salt and butter until creamy and lighter, 2-3 minutes.
  6. Add the egg yolk and cream and beat again until incorporated, about 1 minute.
  7. Scrape mixture out of stand mixer bowl and into cooled tart shell. Then add the 2 cups of rhubarb jam and spread evenly.
  8. Top with thinly sliced pieces of rhubarb. (We choose to lattice the pieces, but you can arrange these any way that you’d like.)
  9. Preheat the oven to 350°F.
  10. Bake until the frangipane is just set, 25-30 minutes. Leave to cool on a wire rack.
  11. Eat warm or cold!

Recipe and Styling Anna Franklin
Photography by Dave Bryce

Subscribe to TABLE Magazine’s print edition.

Springtime Succotash

0
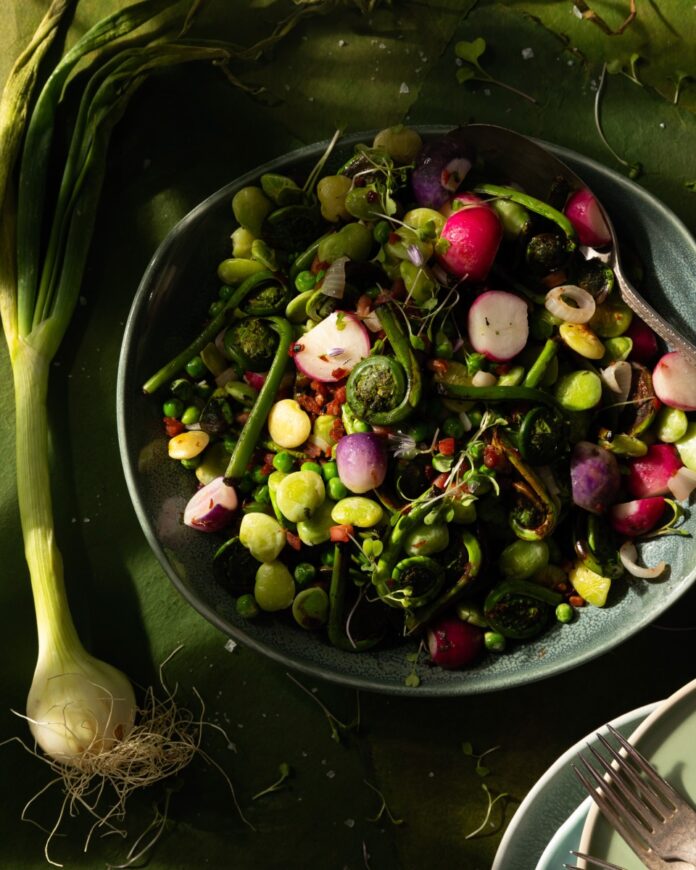
A big teal bowl of springtime vegetable succotash using radishes and various green sprouts as a green onion sits to the left of the bowl.

Some of us remember succotash from our childhoods. It’s basically just a mixed veggie sautée. The combination of fresh vegetables means a meal that’s low-cost to make and still provides a nutritious lunch or dinner. This version brings the dish into the 21st century with the addition of fresh fiddlehead ferns, fresh radishes, and chive flowers. These spring vegetables are the perfect way to transition into the season and make the most of the harvest. Oh, yes—don’t forget some delicious Italian pancetta from your most trusted butcher. Its flavor adds richness to the plate.

Where Does Succotash Come From?

Succotash gets its origins from early America, somewhere between 1745 and 1755. The word itself comes from the Indigenous Algonquian language and quite literally means “boiled whole kernels of corn.” The reason this dish became so popular was because of the way corn, lima beans, and squash (found in the original recipe) would help each other grow year-round. Called “the three sisters” in the Southwest and Mexico, the corn supports the growth of the beans while the squash suppresses the weeds and the beans also enrich the soil. Later on down the line, this dish also supported citizens during the Great Depression whenever food was scarce and filling meals like this one meant a big deal.

Print
clock clock iconcutlery cutlery iconflag flag iconfolder folder iconinstagram instagram iconpinterest pinterest iconfacebook facebook iconprint print iconsquares squares iconheart heart iconheart solid heart solid icon
A big teal bowl of springtime vegetable succotash using radishes and various green sprouts as a green onion sits to the left of the bowl.

Springtime Succotash


  • Author: Anna Franklin

Description

A healthy and nutritious mix of fresh springtime vegetables.


Ingredients

Scale
  • 1 cup pancetta, diced
  • 1 onion, chopped
  • 2 cloves garlic
  • 2 cups fiddlehead ferns
  • 1 bag frozen lima beans, defrosted to room temperature
  • 2 cups fresh or frozen peas, defrosted to room temperature
  • 2 cups radish, diced
  • Chive blossoms


Instructions

  1. In a large sauté pan, add the pancetta and cool until crispy. Add the onion and garlic and sauté for about 1 minute until fragrant.
  2. Add the fiddlehead ferns, lima beans, fresh peas, and radish. Cook until all the vegetables are tender, season with salt and pepper, garnish with chive blossoms and serve.

Recipe and Styling Anna Franklin
Photography by Dave Bryce

Subscribe to TABLE Magazine’s print edition.
Spring Chicken with Fava Shoot Pesto

0
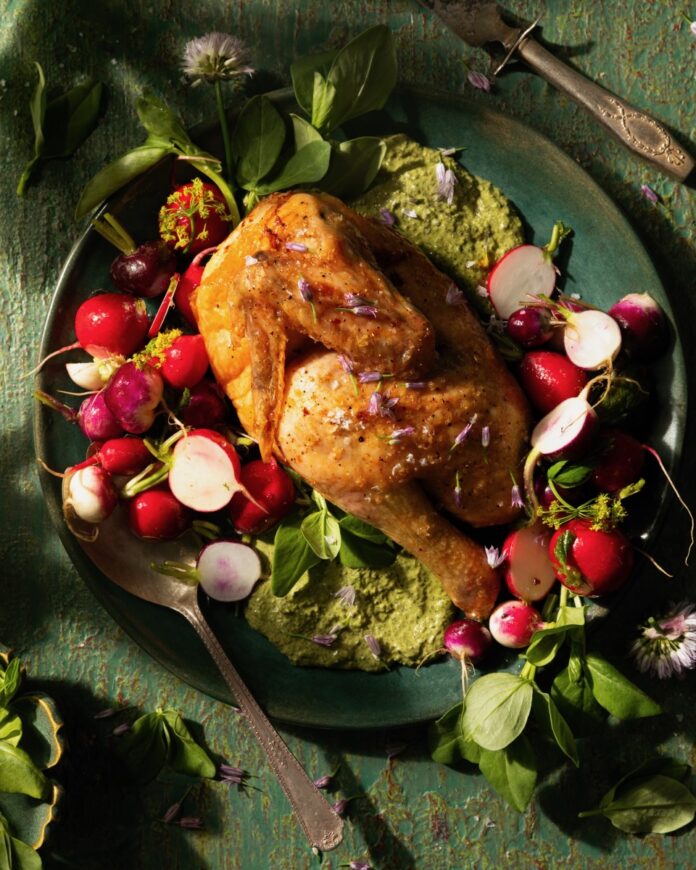
A green plate on a green surface plates spring chicken with a fava shoot pesto and half-cut radishes.

The proverbial spring chicken is young and tender. Follow the recipe here to roast it tenderly and crisp up its skin in the final moments. Along the way, fresh pesto and roasted radishes make their way into the process, bringing in their variously herbaceous, garlicky, and bittersweet flavors. The sum is much greater than the parts; you’ll delight with each bite of fava shoot pesto-covered meat and veg. Serve with a side of Cheesy Grits with Springtime Mushrooms and sips of your favorite dry, sparkling wine.

What Does Fava Shoot Pesto Taste Like?

Fava shoot pesto is a bright, herbaceous pesto that has a subtle sweetness and a nutty undertone. The fava bean shoots themselves contribute the fresh, green or earthy taste that’s reminiscent of peas or young spinach. The addition of pecans lends a richer, more mellow nuttiness compared to the sharper bite of pine nuts in classic pesto. The lemon zest finishes things off with a citrus lift, cutting through the richness of the butter, olive oil, and garlic. Basically, fava shoot pesto is going to be less pungent and more delicate than traditional basil pesto.

Print
clock clock iconcutlery cutlery iconflag flag iconfolder folder iconinstagram instagram iconpinterest pinterest iconfacebook facebook iconprint print iconsquares squares iconheart heart iconheart solid heart solid icon
A green plate on a green surface plates spring chicken with a fava shoot pesto and half-cut radishes.

Spring Chicken with Fava Shoot Pesto


  • Author: Anna Franklin

Description

This recipe screams springtime with fresh ingredients from chicken to pesto.


Ingredients

Scale
  • 1/2 chicken
  • 3 tbsp softened butter
  • Salt and pepper to taste
  • 2 cups whole radishes

For the pesto: 

  • 1/2 stick butter, softened
  • 1/2 cup fava shoots (or basil) (Save extra for garnish)
  • 1/4 cup pecans
  • 1 tsp salt
  • Zest of one lemon
  • 1 small clove of garlic
  • 1/4 cup extra virgin olive oil


Instructions

  1. Pat the chicken dry with paper towels and rub with softened butter. Season with salt and pepper and roast in the oven at 350 degrees until the inside of the chicken is 165 degrees.
  2. Set oven to broil and broil for 5 minutes until the skin gets extra crispy.
  3. While the chicken is roasting, combine all the pesto ingredients in a food processor and blend until you get a smooth, thick pesto. Season with salt and pepper to taste.
  4. Halfway through roasting, add the 2 cups of radishes to the roasting pan.
  5. Once chicken is fully cooked, transfer the chicken and radishes to a serving platter and serve with pesto. Garnish with fresh fava or basil shoots.

Recipe and Styling Anna Franklin
Photography by Dave Bryce

Subscribe to TABLE Magazine’s print edition.
Don't Miss